Friday 29 November 2013

Hip, Hip Hooray

Hello

Here's today's card - 


The image I have used is from Crafter's Companion's Bebunni range and is called Hip, hip hooray. I have coloured it with the following Spectrum Noirs - 


  • Bebunni - BG1, BG2, BG3 and PP1
  • bow and present - LV1 and LV2
I paper pieced the letters in Birthday. The papers I have used are from LOTV's promises paper pad (this was the last of my pad and I had to rummage through my scraps box to find the peices to make the letters in the banner - this is definitely a pad I need to replace!) I cut the image out using Spellbinder's stately circles. The image is bigger than the die so I cut the ears and the B and Y out before I cut the die. I inked whilst still in the die with milled lavender distress ink and matted it onto a Spellbinder's grand decorative circles one. I matted a piece of the paper onto a card blank and inked around the edge with milled lavender distress ink. The border was made using Die'sire's lace border 6 and I wrapped a piece of ribbon from my stash around it before attaching it to the card. The sentiments are also from the stamp set. I inked the edges with milled lavender distress ink and attached to the card as shown.


Thank you for stopping by.


Lesley

Thursday 28 November 2013

Wooden heart

Good morning folks

On my recent shopping trip (supposedly buying clothes for my daughter who seems to grow daily at the moment) I spotted this little beauty 


 It was very reasonably priced and this is what it became - 

I began by stamping the word home down the side of the heart using Clarity Stamp's letterbox kit and Stazon ink . I then masked the word and stamped a Clarity flourish stamp with butterscotch Adirondak ink. 
I made 3 flowers from felt using Spellbinder's bitty blossoms and blossoms 5 dies and to finish added some leaves (also cut from felt) using Spellbinder's foliage die.


A quick and easy gift don't you think? 

Thank you for stopping by.

Lesley

Wednesday 27 November 2013

Christmas Tilda

Good evening everyone

The Magnolia only challenge at The Ribbon Girl's blog is winter or Christmas and here is my card for the challenge - 

 To begin I made the card base using Spellbinder's grand labels 23 and ivory centura pearl. I used the biggest die in the set and scored and folded it in half to create the card. I then matted and layered using the same die set and papers from LOTV's woodland wishes paper pad. I then cut a Spellbinder's grand decorative circles one and attached it to the card base leaving half standing proud. I attached a piece of cream lace (from The Ribbon Girl) and then added 2 Christmas trees cut using a LaLa Land die.

The image is Snowy hugs Tilda and has been coloured with the following Promarkers - 

  • coat, hats, gloves and boots - wild cranberry, burgundy and shale
  • trousers - pear green, moss and olive green
  • skin - satin, blush, dusky pink, sunkissed pink and coral
  • snowman - icicle, pumpkin, orange, burnt sienna and henna
  • hair - spice, terracotta and burnt orange
  • broom - burnt sienna, henna, mustard and gold
  • snow - icicle
  • sky - pastel blue
I added some glitter to the hats, Tilda's coat and the snow. I then cut the image out with scissors and added it to the card base with foam pads.
I added several snowflakes cut using Spellbinder's snowflake dies and the sentiment is from LOTV's handwritten Christmas phrases.
To finish I added some pearls to the centre of the snowflakes and a wooden button to the sentiment (both from the Ribbon Girl).

I would like to enter this card into the following challenges - 


Thank you for stopping by.

Lesley


Tuesday 26 November 2013

Christmas wreath

Good morning folks and a happy Tuesday to you all.

Today's post is something very different for me. I found this white heart in Primark and it looked as if it needed a little love and attention - 

And this is what I did to it - 

Using scraps of LOTV's frosty Christmas paper pad, white and blue centura pearl, white glitter card and silver mirriboard, I cut flowers and leaves using Die'sire holly die, Marianne ivy die and Spellbinder's poinsettia die.

I arranged them and some stamens (from The Ribbon Girl) and some silver ribbon (from my stash) and attached them using Pinflair onto the heart.


I added some blue gems from The Ribbon Girl to the centre of the flowers. To finish I removed the ribbon that was on the heart and replaced it with some silver ribbon from my stash.

I hope you like it. I was very pleased with the results.

Thank you for stopping by.

Lesley


Monday 25 November 2013

Celebrate

Good Morning everyone

Today's card is a very simple and plain one for me -


I started by making a 6 inch card base using my Ultimate Pro and some black centura pearl card. The papers are from a Papermania pad that I've had in my stash for a long time and is called liquorice sherbert. The image is a LOTV one called Put your feet up (ST419) and has been coloured with the following promarkers - 


  • cool grey 1, cool grey 2, cool grey 3, cool grey 4, cool grey 5, almond, putty and dusky pink
I cut the image out using Spellbinder's marvelous squares and inked whilst still in the die with black soot distress ink. I stamp several of the words that come in the LOTV's mixed circular sentiment set, cut them out with scissors and then inked around the egde with black soot distress ink. To finish I added some black satin ribbon from my stash and some small black buttons.


Thank you for stopping by.

Lesley

Sunday 24 November 2013

Snow fun

Good Morning - I hope you are enjoying your weekend. I am not doing my normal ironing marathon today - hooray!! Not so hooray - my washing machine died of exhaustion yesterday and so is off to the great washing machine abyss on Tuesday when the new one arrives. But no ironing means more craft time - yippee!!!!  I picked up a couple of inexpensive hanging things yesterday so I am planning to alter them and make them more personnel so I should have something a bit different to show you in a few days (if I like the finished product!)

Anyway onto today's card and here it is -

The image is from Crafter's Companion's Humphrey's Corner range and is called snow fun. I have coloured the image with the following Spectrum noirs - 

  • Humphrey - BG1, BG2 and BG3
  • coat - TB1, TB2 and TB3
  • boots - TB5, TB7, BGR4, BGR1 and BGR2
  • scarf and mittens - BGR1, BGR2, TB1 and TB2
  • snow - IG1
  • sky - IB1
I added some stickles to the snow and snowflakes. I cut the image out using Die'sire square die from Elegance stamping frame and inked whilst still in the die with tumbled glass distress ink. I added a thin matt of pale blue centura pearl and then matted the image onto the elegance stamping frame cut from white centura pearl. I then ran a piece of pale blue centura pearl through the Grand Calibur with an Embossolicious snowflake embossing folder and then matted and layered it onto white centura pearl and dark blue centura pearl. I wrapped a piece of lace and blue velvet ribbon around the card and attached it to a 8 inch card blank cut from white centura pearl. I then attached the image to the base and added some snowflakes cut using Die'sire snowflake dies and white centura pearl.

To finish I added some blue gems to the frame and the centre of the snowflakes.

I would like to enter this card into the following challenges - 

http://www.crafterscompanion.co.uk/blog/crafterscompetition/2013/11/november-challenge-inspiration

Thank you for stopping by.

Lesley


Saturday 23 November 2013

Welcome baby

Hello, happy Saturday to you all.

Here is today's card - 


I started by making a 6 inch square card blank using my Ultimate Pro and some yellow centura pearl. I cut about an inch off the front and cut the edge with an EK success border punch. To the inside of the card I added another piece of centura pearl which I had embossed along one edge with an embossing folder which came free with edition 2 of the Crafter's Companion Inspiration magazine. The image is from Crafter's Companion's Humphrey's Corner range and is called New baby.
I made the backing by stamping one of the smaller stamps which comes with the set randomly over a piece of card and then coloured with the following Spectrum Noirs - 


  • rabbit - BG1 and BG3
  • teddy - CT1 and CT3
I wrapped some yellow ribbon (from my stash) around two pieces of the backing paper and added them to the card front and to the inside of the card.
I stamped the main image and coloured it with the following Spectrum Noirs -


  • Humphrey - BG1, BG2 and BG3
  • towel - CT1, CT2 and CT3
  • shadows - IB1 and IG1
I cut the image out with scissors and matted it onto a Die'sire doily cut from yellow centura pearl. I then added this to the card from using foam pads for dimension. To finish I stamped a sentiment from the stamp set , cut it out using Spellbinder's rectangle die and then inked around the edge of the die cut with a CT3 Spectrum noir pen. (I used the chisel end of the pen which gives a smoother finish).


I would like to enter this card into the following challenge - 

http://www.crafterscompanion.co.uk/blog/crafterscompetition/2013/11/baby-challenge-take-two

Thank you for stopping by.

Lesley

Friday 22 November 2013

The Holly and The Ivy

Good evening everyone. Here we are at Friday night yet again. They keep coming around very quickly don't they.

The colour challenge at the Ribbon Girl this week is "all white" and this is the picture they gave for inspiration -


Now I could see a little silver on this photo so I decided to take a little artistic license and include a hint of silver on my card. The other problem was that I couldn't decided how to include my hint of silver so I did 2 cards and here they are - 

 Gilding flakes

Silver embossing powder

The stamp is a Clarity stamp which is actually the first Clarity stamp I bought and on the first card I used gilding flakes (indigo blue) and on the second one I used silver embossing powder.
Looking at them now I actually prefer the one using embossing powder.


The die I have used is Spellbinder's filigree delight and I matted each one onto silver mirriboard. I them embossed a piece of white cenutra pearl card using an Embossolicious snowflake embossing folder. To finish I added some silver gems.


I would like to enter these cards into the following challenge -

Thank you for stopping by.

Lesley

Tuesday 19 November 2013

You don't bring me flowers

Hello

The challenge at Crafty Little Fairies this week is Top of the Pops - inspired by a song. I thought this was going to be tricky but after spending the weekend searching through my stamps I had a light-bulb moment -

You Don't Bring Me Flowers by Barbara Streisand and Neil Diamond.

So here is my card -


To create the base I cut a Spellbinder's grand decorative circles one from white centura pearl and folded it in half. I then matted and layered the base with papers from First Edition Summer Breeze paper pad.


The image is from LOTV and is called Thomas - big bunch of flowers (ST027). It has been coloured with the following Promarkers -


  • Thomas - sandstone, tan, henna, pastel pink and coral
  • flowers - pastel pink, coral, soft green, pastel green, grey green and warm grey 2
  • sky - pastel blue
  • shadow - warm grey 2
I cut the image out using a Spellbinder's oval nestie and inked whilst still in the die with tumbled glass distress ink. I then matted it onto a Spellbinder's floral oval. I made a border from a piece of the paper and a Joanna Sheen lace border die, attached it to the card and then attached the border. To finish I added some blue, peach and brown flowers from The Ribbon Girl.

I would like to enter this into the following challenge - 

http://craftylittlefairieschallenge.blogspot.co.uk - Top Of The Pops (inspired by a song)

Many thanks for stopping by

Lesley

Monday 18 November 2013

Annabel's Christmas

Good evening everyone

Here is today's card - 


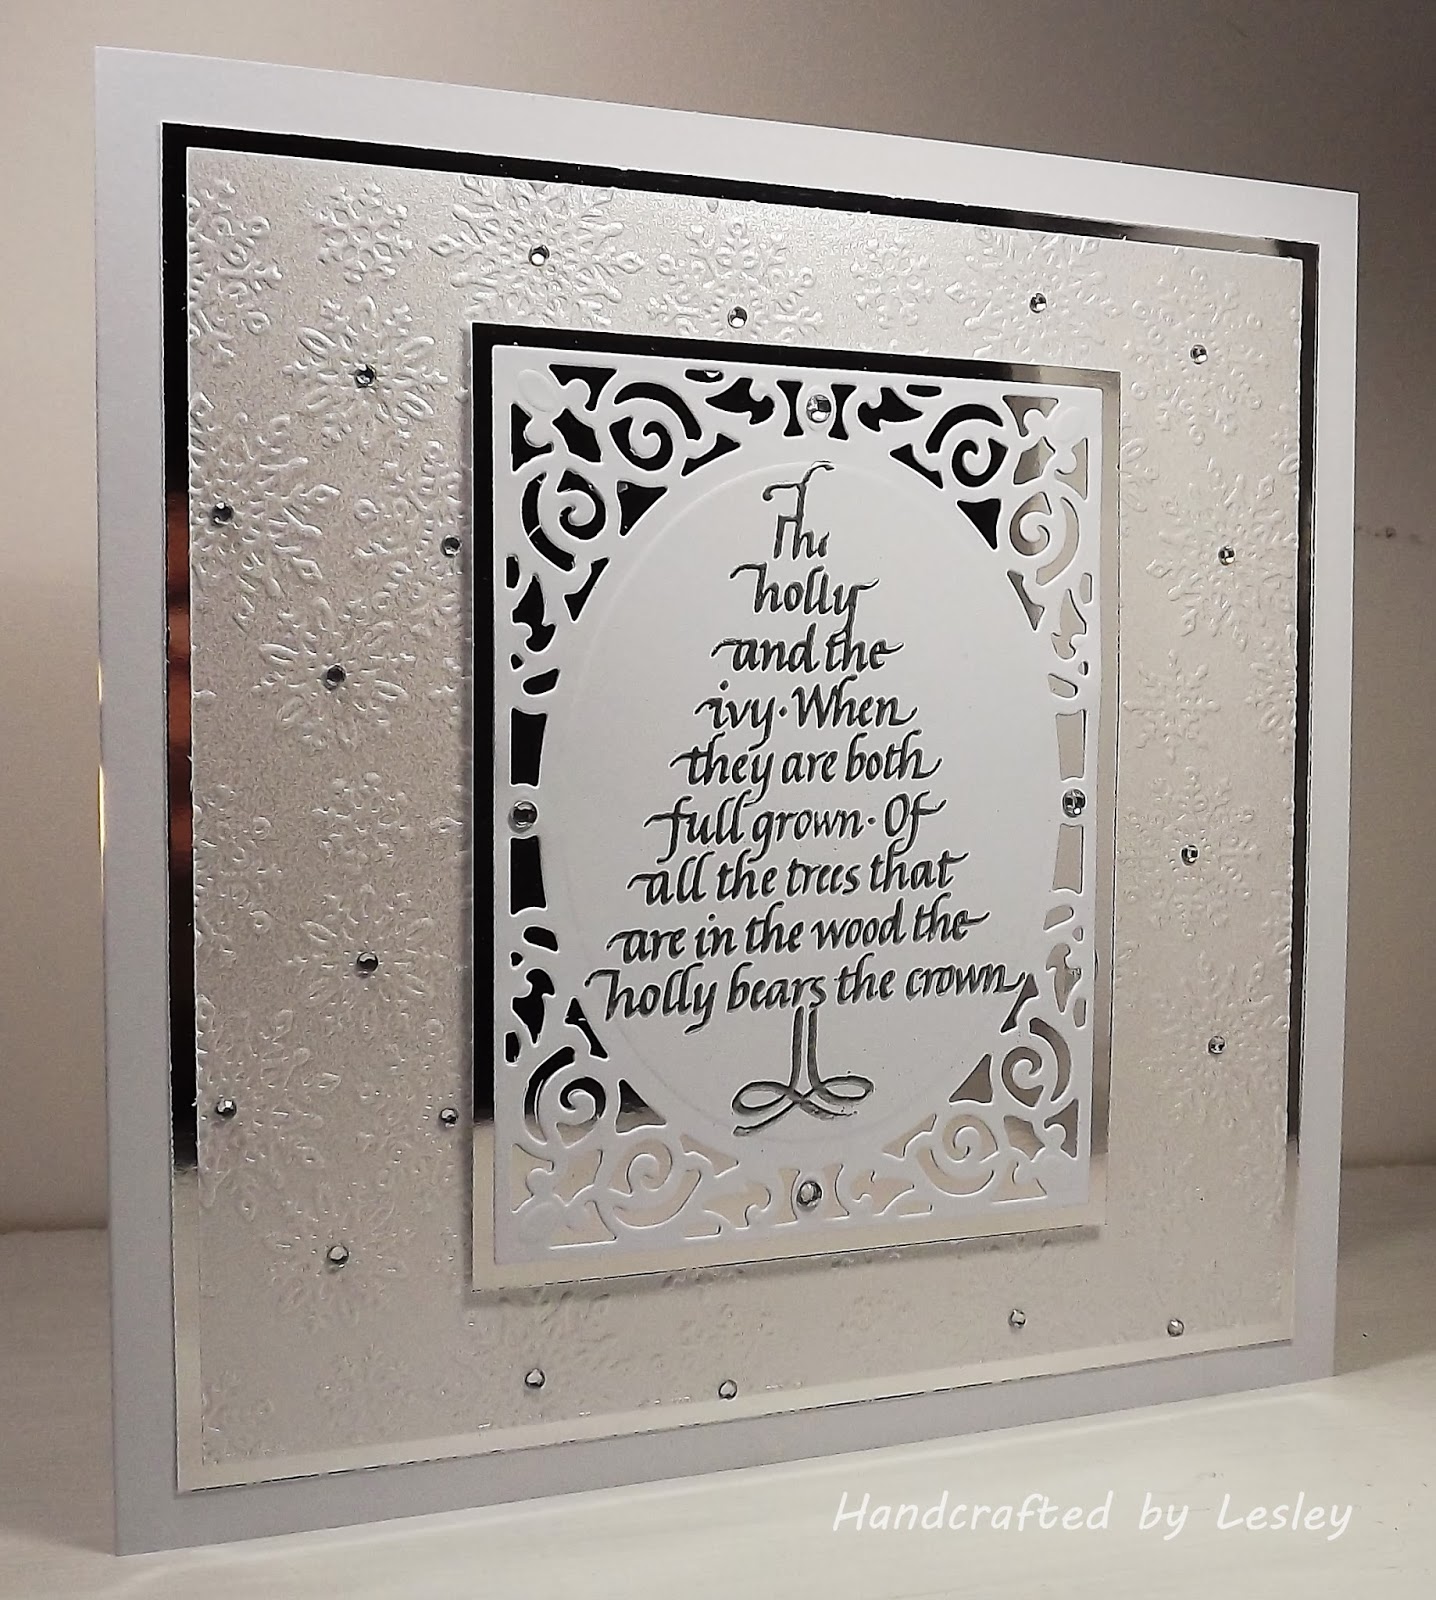
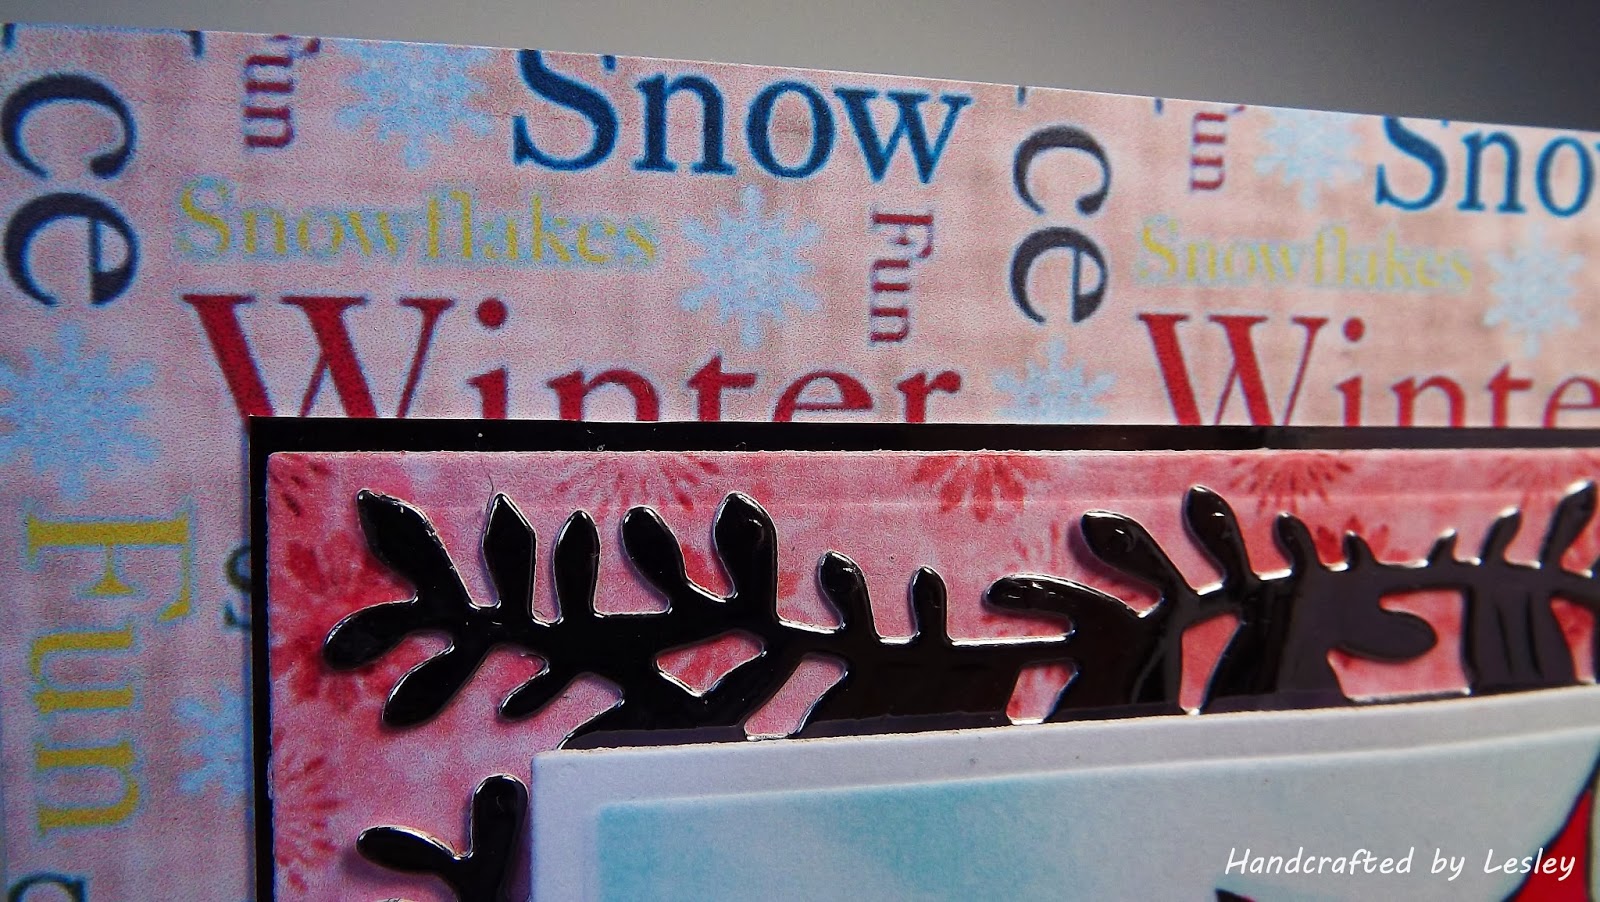
I started with a 6 inch card blank and I cut the front of the card in half using Joanna Sheen's lace border die (a new purchase for me - it cuts beautifully and comes out of the die easily). I then cut the back of the card with the same die. I matted and layered the front and the base of the card with papers from the Wild Rose Annabel's Christmas paper pad. The image is also from Wild Rose Annabel's Christmas range and is called posting letters. I have coloured it with the following Promarkers - 


  • hat - caramel, tan and sandstone
  • dress, shoes and gloves - berry red, ruby, crimson, holly and pine
  • hair - henna
  • skin - almond and putty
  • dog - ivory, raw sienna, burnt sienna and berry
  • post box - berry red, ruby, crimson, gold, pine, holly, moss, henna, tan and cool grey 5
  • letters - satin and ivory
  • birds - sandstone and henna
  • sky - powder blue
  • snow - icicle
I then added glitter to the snow and the post box. I cut the image out using a Spellbinder's rectangle die and inked whilst still in the die with tumbled glass distress ink. I then matted the image onto a Spellbinder's fleur de lis rectangle. I attached the image to the card front as shown. I then cut a Spellbinder's poinsettia and two pieces of ivy using a Marianne die and attached them to the inside of the card. To finish I added some gold gems to the centre of the poinsettia.


I would like to enter this card into the following challenge - 


Thank you for stopping by.

Lesley

Saturday 16 November 2013

Poinsettia kitten

Good Saturday morning to you all.

I am not sure about today's card. This is one that may never be sent to anyone. I wasn't even sure whether to post it or not. It has sat in my drafts box for a while now. This is it - 

Now don't get me wrong I love the image which was printed off the free Crafter's Companion CD (free with new Inspirations magazine) and I like the way I have coloured it. Not 100% sure about the backing papers though (again printed off the free CD). Whenever I print papers off the computer the colours never seem to be as vibrant as the one on the computer screen. I don't do a lot of CD crafting for this reason and not sure where I am going wrong. We have had several printers and I have used lots of different papers but I am still not 100% happy with the results.


I coloured the image with Spectrum Noirs. I cut the image out cut out with Spellbinder's matting basics A and inked whilst still in the die with tumbled glass distress ink. I then cut a Spellbinder's branching out (love this die) using silver mirriboard and matted the image onto it. I then matted and layered the die cut onto papers from the CD and silver mirriboard.

I then cut 3 poinsettia flowers using my Spellbinders die from the red paper from the CD and inked whilst still in the die with fired brick distress ink. I also cut 2 of the largest dies from silver mirriboard to act as leaves. I added some stems from The Ribbon Girl and some gold gems to the centre of the flowers. I also added some gold gems to the centre of the poinsettia in the image.


So what do you think. Please feel free to leave a comment in the box below. I look forward to reading them. And if you could help with my printing problems that would be fantastic.

Thanks for stopping by.

Lesley


Thursday 14 November 2013

Polar pair

Good evening folks. I hope you are all well this Thursday evening.

The Lovely Lili challenge at the Ribbon Girl blog is "add sparkle" and this is my card - 

I made a twisted easel card from a 8 inch card base and matted and layered with papers from LOTV's winter wonderland paper pad (these are so yummy and make a real change from the traditional Christmas colours).  I also wrapped some cream lace and burgundy velvet ribbon (from The Ribbon Girl) around the card base.


The image is called Polar Pair (ST437) from LOTV and has been coloured with the following Promarkers - 

  • hats - crimson, burgundy, shale, ice grey 1 and ice grey 3
  • scarves - holly, pine, crimson, burgundy and shale
  • robin - burgundy, raw sienna and henna
  • log - sandstone, tan, walnut and burnt sienna
  • bears - ice grey 1, burgundy and pale pink
  • snow - icicle
  • sky - arctic blue
I added glitter to the bear's hats and the snow. Then I cut the image out using Spellbinder's labels 11 and inked whilst still in the die with tumbled glass distress ink. I then matted it onto Spellbinder's decorative labels 8 and added it to the easel. I cut a poinsettia flower using a Spellbinder die and added some ivy cut using a Marianne die. I added a gem to the centre of the flower.

To create the stopper I stamped a sentiment using LOTV's handwritten Christmas phrases, cut it out using Spellbinder's matting basics A and inked whilst still in the die with antique linen distress ink. I matted it onto a plum paper from the pad and added two more pieces of ivy. 

To finish I added some gems to the image.

I would like to enter this card into the following challenge - 


Thank you for stopping by.

Lesley


Wednesday 13 November 2013

Pink and white

Hello

The monthly challenge at LOTV is pink and white and this is my card - 


I started with a scalloped card blank which I folded in half and then trimmed. I matted and layered some pink centura pearl onto the card front and inside of the card. I then ran some white centura pearl through Spellbinder's butterfly kisses embossing folder but instead of using the embossed side of the card I used the debossed size for a change. I added some pink ribbon (from the Ribbon Girl) to the edge of the larger piece of card and added it to the card base.
The image I have used is LOTV's kitten cuddles (ST390) and has been coloured with the following Promarkers - 

  • hair - raw sienna, burnt sienna and henna
  • skin - almond, putty, dusky pink and pastel pink
  • dress and shoes - baby pink, rose pink and antique pink
  • swing - walnut, umber and sandstone
  • flowers - baby pink, rose pink, antique pink, moss green and marsh green
  • kitten - spice and burnt orange
  • sky - arctic blue
I cut the image out with a Spellbinder's oval nestie and inked whilst still in the die with tumbled glass distress ink. I then cut a Spellbinder's floral oval from pink centura pearl and matted the image onto it. I then added this to the front of the card as shown.


The sentiment is from LOTV grungy everyday sentiments which I cut out with scissors and inked around the edge with spun sugar distress ink.


To finish I added some pink flowers again from the Ribbon Girl.

I would like to enter this card into the following challenge - 


Thank you for stopping by.

Lesley