Monday 31 March 2014

Baby pink

Good Monday morning to you all.
Can you believe it is the first of April tomorrow. I struggled to get up this morning - I had become used to it being light when I got up but because of the clocks springing forward yesterday it is back to being dark again. Oh well I suppose the lighter evenings will make up for it. And the weather is being lovely and spring like too which is lovely.
The ladies at In the pink challenge want to see cards using mainly pink for children or babies so here is my card. It is a very pale pink but the photos just seem to have washed it out to virtually white - 
I began by making a 6 inch card blank using my trusty Ultimate Pro and some white centura pearl card. I then punched the front edge of the card with a Tonic dotty lace border punch. I matted the inside of the card with a pink gingham paperwhich you can hopefully see on the photo -
I then matted the front with another pink paper. All the papers are from Docraft's New arrival paper pad by the way. I then cut a dotty lace circle using 2 of the die from the Tonic set and another pink paper, then attached it to the card front with foam pads. The image is from Docraft's New arrivals stamp set and has been coloured with the following Spectrum Noirs - 
  • bear - IG1, IG2, IG3, PP1 and PP3
  • rabbit - PP3, PP4 and IG1
  • shadows - IB1 and BG1
I cut out the image and attached it to the card front with Pinflair.
The sentiment is also from the stamp set which I cut out using a Die-namics stitched circle die and inked whilst still in the die with spun sugar distress ink. I then attached it to the bottom corner of the card with foam pads.
To finish I added some pearls (which I coloured with PP1 spectrum pen) to the border.
I would like to enter this card into the following challenge - 
http://inthepinkchallenge.blogspot.co.uk - challenge 40-kiddies corner or babies

Thank you for stopping by.

Lesley


Sunday 30 March 2014

Mother's Day

Hello and a Happy mother's day to all you mothers, mums, nanas, grannys and grandmas out there. I have you all are enjoying your day.
This is the card I made for my mum - 
I began by trimming a 8 inch card blank to 7and half inches and then I matted and layered it with a piece of lilca centura pearl which I had run through an Embossalicious roses embossing folder (I de-bossed it rather than embossed it. I find the die cuts stick better to a de-bossed card). I then cut 4 Tonic corners from white centura pearl and added them to the card base in each corner.
Then I cut a square of white centura pearl using the largest Tonic square die. I then cut the dies from Tonic's dotty lace collection to create the doily effect on the square. I attached it to the centre of the card with foam pads.
The sentiment is from LOTV's happy circular sentiment set which I heat embossed with silver embossing powder. When it was cool I coloured the flowers with a lilac and purple Promarker. I cut the sentiment out using a Die-namics stitched circle die and matted it onto a lilca centura pearl die cut (using the smaller die from Tonic's dotty lace die set). I then attached this to the centre of the dotty lace doily with double foam pads to add height.
To finish I added some lilac pearls from the Ribbon Girl.

Many thanks for stopping by. 

Lesley

Saturday 29 March 2014

Close knit friends

Hello everyone

A very happy Saturday evening to you all. My spending spree at Crafter's Companion included this stamp from the Rachelle Anne Miller range - 
I began with a 8 inch card blank which I covered with a piece of blue spotty paper from LOTV's Shabby shack paper pad. I then trimmed another paper from the pad to 7 and a half inches, cut with Die'sire lace border 6 and inked whilst still in the die with tumbled glass distress ink. I then wrapped a piece of ribbon from the Ribbon Girl around the paper and attached it to the card base.
The image as I said is from Crafter's Companion and is called Close knit friends. I coloured the image with the following Promarkers - 
  • hair - sandstone, caramel and umber
  • skin - satin, blush, dusky pink and coral
  • dress - pink carnation, rose pink, fuchsia pink, pastel blue, denim and arctic blue
  • knitting - pastel blue, blue pearl and china blue
  • birds - blue pearl and china blue
  • grass - lime, pear and marsh green
  • flowers - fuchsia pink and china blue
  • butterfly - pastel blue, denim and china blue
  • bee - gold
  • sky - powder blue
I cut the image out using Die-namics stitched circle and inked whilst still in the die with tumbled glass distress ink. I cut a Die'sire Chantilly lace stamping frame from a paper from the Shabby shack pad and attached the image to it. I then attached the image to the card with foam pads.
I cut several Doohickey vintage daisies, inked the edges with tumbled glass distress ink and layered them up. I also punched several petal pairs flowers, shaped them and layered them up. I arranged the flowers onto the card base along with some ivy cut using a Marianne die. I added pearls (from the Ribbon Girl) to the centre of each flower.
To finish I added a couple of tags using LOTV's sentiment tags stamp set.

I would like to enter this card into the following challenges - 
http://www.allsortschallenge.blogspot.co.uk - week 252 - use those dies

Thank you stopping by.

Lesley


Wednesday 26 March 2014

Wise words

Hello Folks and a very happy Wednesday to you all.

My recent shopping spree at Crafter's Companion included a lovely little owl stamp and this is the card I made with it - 
I began with a 8inch card blank which I matted and layered with a piece of spotty paper from LOTV's Father knows best paper pad. I then trimmed another piece of the papers to 7 and a half inches, wrapped a piece of bakers twine around it and attached to the card base. The image is from Crafter's Companion's Rachelle Anne Miller range and is called Wise words which I coloured with the following Spectrum Noirs - 
  • owls - EB1, EB2, EB4, EB6 and EB8
  • branches - EB2, EB3, EB5 and EB7
  • leaves - DG2, DG3 and DG4
  • sky - IB1
I cut the image out with Die'sire Elegance stamping frame square, inked whilst still in the die with tumbled glass distress ink and  matted it onto the fancy shape in the die set. I attached it to the card with foam pads. The sentiment is also from the stamp set which I cut out and matted with Die'sire's Nouvea stamping frame, inked with tumbled glass distress ink and attached to the card with Pinflair (I needed it to fit under the image so the Pinflair allowed some wriggle time!)
I added some leaves to the image and the sentiment to finish (I used Spellbinder's Bitty Blossom die).

I would like to enter this card into the following challenge - 

Thank you for stopping by.

Lesley


Monday 24 March 2014

Ribbon Girl giveaway

Hello Happy Monday to you all

To help kickstart your week Mary and Andrea over at the Ribbon Girl are having a little giveaway. Here is a picture of the goodies they are giving away
To enter the giveaway simply click on the link ( Ribbon Girl blog), leave a lovely comment and display this picture on your blog.

Sorry this is a short post. I have done some crafting over the weekend but they have been Mother's day cards and I can't show them yet (My mother-in-law reads my blog and I don't want to spoil the surprise - Hi Irene). I promise to be back soon with a card.

Thanks for stopping by.

Lesley

Sunday 23 March 2014

Down on the farm

Hello everyone

So sorry for my lack of blogging just lately - life seems to have taken over at the moment (tsk, tsk must try harder).
The challenge this week at Crafty Little Fairies is "down on the farm" and here is my card for the challenge  (apologies for the photo quality today - would you believe it was too sunny!!) -
I began with a 6 inch kraft card blank. I cut the largest die from Tonic's square die set and LOTV's shabby shack paper pad (love this pad - it's my new favourite) which I faux stitched around the edge and attached to the card blank. I then cut a border strip and punched one edge with Tonic's dotty lace border punch, added some green ribbon (this came from a free gift from Docraft's Creativity magazine - this month's edition), some faux stitching and then attached it to the side of the card.
The image is a new stamp (not been so busy that I couldn't indulge in a little retail therapy - it's good for de-stressing!) from Crafter's Companion's Rachelle Anne Miller range and is called Love Ewe which I coloured with the following Spectrum Noirs -
  • sheep - EB1, FS3, FS5, IG1, IG2, IG4, IG7, CR1 and CR2
  • grass - LG2 and LG5
  • sky - IB1
I cut the image out with a Tonic square die, inked whilst still in the die with tumbled glass distress ink, matted onto a larger square cut from kraft card, added some faux stitching and then attached to the card base with foam pads.
I cut some Memory Box puffy clouds from scraps of the blue paper from the paper pad and attached them to the card with Pinflair for dimension.
The sentiment is from the stamp set and I cut it out with a Tonic Dotty lace die. I inked whilst still in the die with tumbled glass distress ink and matted it onto another die cut using the blue paper from the paper pad. I attached it to the card with Pinflair.

I would like to enter this card into the following challenge -

Thank you stopping by.

Lesley

Monday 17 March 2014

Spring green

Hello folks. 

The colour challenge at the Ribbon Girl is GREEN and here is my card for the challenge - 
I began with a 6 inch card blank which I matted with a piece of green paper from LOTV's Shabby shack paper pad. I cut another piece of paper from the pad, inked around the edge with peeled paint distress ink and then attached a piece of white lace and green spotty ribbon (from the Ribbon Girl) around the centre. I then attached it to the card base. The image from LOTV called flower arranging (ST 392) and has been coloured with the following Promarkers - 
  • rabbit - cool grey 1, cool grey 2, cool grey 3, cool grey 4 and cool grey 5
  • flowers and vase - pastel blue, denim, arctic blue, bright green, meadow green, apple, leaf green, bright green and April showers
  • shadows - warm grey 1, warm grey 3 and powder blue
I cut the image out with Tonic nesting squares, inked whilst still in the die with tumbled glass distress ink and matted it onto a larger square cut from green paper from the paper pad. I then attached it onto the card base with foam pads.
I cut 2 Tonic fanciful flourishes from green paper and attached them to the card base. I didn't have any green flowers so I inked the edges of some white flowers with peeled paint distress ink. They had yellow stamens which I removed, added some green pearls (which I coloured with a bright green Promarker) and then attached them to the card base. I then added a couple of small blue flowers. All the flowers are available from the Ribbon Girl.
I would like to enter this card into the following challenge - 
http://www.theribbongirlchallengeblog.blogspot.co.uk - March colour challenge - green

Thank you for stopping by

Lesley


Sunday 16 March 2014

Fairy magic

Hello and a happy Sunday evening to you.

Here is today's card - 
I began with a 8 inch card blank which I matted and layered with a grey wood effect paper from LOTV's Heartfelt paper pad and inked the edge with spun sugar distress ink. I then cut another of the papers with a Tonic dotty lace border punch and matted it onto a piece of pink paper from the paper pad. I wrapped a piece of pink velvet ribbon (from the Ribbon Girl) around the paper and attached it to the card base. The image is LOTV's Freedom (ST137) and has been coloured with the following Promarkers - 
  • hair - cocoa, walnut and henna
  • skin - satin, blush and dusky pink
  • dress and shoes - pale pink, baby pink, cocktail pink and cardinal red
  • stem - lush green, pine green and holly
  • wings - ice grey 1 and ice grey 2
  • sky - pastel blue
I added some glitter to her wings (well she is a fairy) and then cut the image out using Spellbinder's decorative labels 8. I inked whilst still in the die with spun sugar distress ink and then around the edge of the die cut too. I attached the image to the card base with foam pads.
I then cut a Tonic Mazarine blue,several butterflies and a Tonic fanciful flourish from the papers and arranged them onto the card as shown.
To finish I added some pink pearls from the Ribbon Girl to the image die cut and the butterflies.

I would like to enter this card into the following challenges - 
http://www.allsortschallenge.blogspot.co.uk - week 250 - pretty in pink

Thank you for stopping by.

Lesley


Friday 14 March 2014

Blue and green......

Hello everyone and a very happy Friday evening to you all.

Here is today's card - 

I began by cutting an inch off the front of a 8 inch card blank and then cutting the edge with a Tonic rose border punch. I then matted and layered the front and inside of the card with papers from LOTV's Shabby shack paper pad. The image is from LOTV called Shall we dance (ST 304) and has been coloured with the following Promarkers - 
  • bears - ice grey 1, ice grey 2, ice grey 3, ice grey 4, ice grey 5 and antique pink
  • dress, shoes and bow - pastel blue, denim blue, arctic blue, meadow green, apple green and leaf green
  • coat - meadow green, apple green and leaf green
  • shadows - warm grey 1, warm grey 3 and powder blue
I cut the image out using Die-namics' stitched circle and inked whilst still in the die with tumbled glass distress ink. I then matted the image onto a Tonic rose circle doily cut from one of the papers and then attached it to the card base with foam pads.
I cut a LaLa Land heart banner and added it to the inside of the card as shown. I also cut 2 LaLa Land heat ribbon corner and attached them to the front of the card.
Then I cut 2 Doohickey vintage daises, layered them and used a pearl brad (from the Ribbon Girl) to secure them. I inked the outer edges of the flower with tumbled glass distress ink and attached it to the card front along with some small flowers from the Ribbon Girl.
I would like to enter this card into the following challenges - 
http://www.theribbongirlchallengeblog.blogspot.co.uk - Lovely Lili challenge - animals
http://ilovepromarkers.blogspot.co.uk - challenge 210-lets get spotty

Thank you for stopping by

Lesley

Thursday 13 March 2014

Missed the boat

Good afternoon everyone. I hope you are all enjoying this beautiful weather we are having at the moment.

This is today's card - 

I originally made this card for Magnolia Down Under Challenge when the challenge was "butterflies" but as usual I was cutting it a bit fine and actually ended up missing the deadline altogether (that will teach me to get things finished before I go gallivanting with the girls for the weekend). I loved the way the card turned out so I have decided to post it anyway.
I began by making a shaped card blank using a 8 inch card blank and Go Kreate's XXL square frames frilly #5 which I matted and layered with Docraft's kraft notes paper pad and the Go kreate dies. I created the border using Tonic' s dotty lace punch and a piece of ribbon (from the Ribbon Girl). 
The image is Butterfly dreams Tilda which I coloured with the following Spectrum Noirs - 
  • hair - TN4, TN6 and TN7
  • skin - TN1, FS1, FS4 and CR1
  • shoes and flowers - GT1, GT2, GT3, IG1 and BP1
  • butterflies - GT1, GT3 and BP1
  • shadows - IG1 and IB1
I couldn't find the right colour for the dress so I paper pieced it using one of the papers from the paper pad. I cut the image out using Spellbinder's floral ovals and inked whilst still in the die with tumbled glass distress ink. I cut a Tonic dotty circle die cut from one of the papers, attached it to the card base and then attached the image using foam pads. I cut a LaLa land hearts banner and 2 Doohickey vintage daisies (I matted the 2 together and secured them with a pearl brad from the Ribbon Girl) from the papers and attached them to the card base as shown. To finish I added a sentiment using LOTV's sentiment tags set (set 24).

Thanks for stopping by

Lesley


Saturday 8 March 2014

Thank you too

Hello happy Saturday to you all.

I am away with my girl friends this weekend for such much needed R and R so this is a scheduled post.  I have fallen in love with this lovely little stamp from LOTV. It is such a versatile little stamp and I think you will be seeing a lot of this little bear.
I began by matting and layering a 6 inch card blank with papers from First Edition Boho Chic paper pad. I cut 4 flourishes using Tonic's Fanciful Flourishes. I added these to the corners of the card as shown. The image is James peeping (from LOTV) which I have coloured with the following Spectrum Noirs - 
  • James - IG1, IG2 and IG3
  • background - CR1, CR2, TN6 and IB1
I cut the image out using Spellbinder's Marvelous squares and inked whilst still in the die with scattered straw distress ink. I then matted the image onto a larger die from the set. I attached the image to the card base with foam pads.
To finish I added a sentiment from LOTV's sentiment tags set (set 24).

Thank you for stopping by.

Lesley


Thursday 6 March 2014

Art Deco birthday

Hello Folks

Today is my friend Shelia's birthday. She is a glamorous lady who loves Art Deco and so here is the card I made for her -
I began by embossing a piece of gold centura pearl and a piece of black centura pearl using a Docraft's Art Deco embossing folder. I then cut out the centre of embossed black card and attached it to the centre of the embossed gold card. I then matted and layered it onto black and gold centura pearl. I used my Perfect Layers tools to get the accurate mats and layers. I then attached the topper to a black card blank (made with black centura pearl and my Ultimate Pro). The image is from a set which came free with a copy of Docraft's Creativity magazine and I coloured it with the following Promarkers -
  • skin - almond, putty and dusky pink
  • lips - berry red
  • dress - gold, cinnamon and black
  • cape - cool grey 4, cool grey 5 and black
  • shadow - warm grey 1 and warm grey 3
  • sky - pastel blue
I cut the image out with scissors and attached to the card blank with Pinflair. I then cut an Anemone flower topper from gold centura pearl and attached it to the card along with some feathers and 2 hat pins. I added a black dazzler to the centre of the flower. To finish I stamped a sentiment from the set onto gold centura pearl and cut out using the smallest die from Spellbinder's Resplendent rectangles.

Happy Birthday Shelia.

Thank you for stopping by.

Lesley

Tuesday 4 March 2014

Spring has sprung

Hello folks

I made today's card for the Allsorts challenge which is "Spring is coming". Well it certainly has here. We have had some lovely sunny days recently and the daffodils are beginning to flower so with that in mind this is my card for the challenge - 
I began by matting and layering an 8 inch card blank with green core'dinations cardstock. I then took a piece of elegant stain white paper and randomly stamped with a Clarity Stamp leafy swirl stamp and yellow Momento ink. I ran the paper through the Grand Calibur with an Embossalicious rose embossing folder and then inked around the edge of the paper with scattered straw distress ink. I matted and layered the backing paper onto a piece of yellow core'dinations and attached it to the card base. The image is a Joanna Sheen House Mouse stamp called Spring - Daffodil which I coloured with the following Promarkers -
  • daffodil - mustard, gold, mango, orange, green, lush green and pine
  • mouse - oatmeal, cinnamon and burnt sienna
  • raindrops - April showers
  • sky - pastel blue
  • grass - pine
I cut the image out using scissors (I drew around the inside of the Spellbinder's die and then cut out) and then ran a pastel blue Promarker around the edge. I matted the image onto a Spellbinder's Fleur de Lis rectangle cut from a piece of green core'dinations. I attached the image to the card base with foam pads as shown. I then cut several leaves (using Spellbinder's foliage dies) and flowers (using Die'namics plentiful petals) from scraps of green and yellow core'dinations and arranged them onto the card as shown. 
The sentiment is from the stamp set. I cut it out using Die'namics stitched circles, inked whilst still in the die with scattered straw distress ink and matted it onto a larger stitched circle cut from yellow core'dinations card.
To finish I added some pearls to the centre of the flower which I coloured with an orange Promarker.
I would like to enter this card into the following challenge -
http://www.allsortschallenge.blogspot.co.uk - week 248 spring is coming

Thank you for stopping by

Lesley

Monday 3 March 2014

Thank you

Hello Happy Monday to you all.

A few weeks ago I was lucky enough to win the LOTV challenge at The Ribbon Girl. I won some beautiful goodies from the Ribbon Girl and a stamp of my choice from LOTV. I picked James - peeping (ST486). This is a card I made using the stamp - 
I began by matting and layering a 6 inch card blank with lilac core'dinations and Docraft's Kraft notes papers. I cut 4 corners using Tonic pansy arch die and lilac core'dinations. I attached them to the corners of the card. I stamped James and coloured him with the following Spectrum Noirs - 
  • James - BG1, BG2 and BG3
  • background - PL1, PL2 and PL5
  • outer edge - IB1
I added some glossy accents to James' nose and then I cut the image out using Spellbinder's Marvelous squares and inked whilst still in the die with tumbled glass distress ink. I matted it on the largest die in the set cut from the Kraft notes paper and attached it to the card using foam pads. I then added a sentiment from LOTV's sentiment tag set (set 24). To finish I added some pearls to the image and to the corners.

Thank you for stopping by.

Lesley


Sunday 2 March 2014

Shopping

Good evening folks

I hope you have all had a good weekend. My husband and youngest 2 children arrived home safely late last night so I have spent today catching up with them and their washing! But I did manage a little crafting and here is the result - 
The challenge at Crafty Little Fairies is shopping so I thought if you are shopping you need your handbag so I made one of those too. Let's start with the card shall we - 
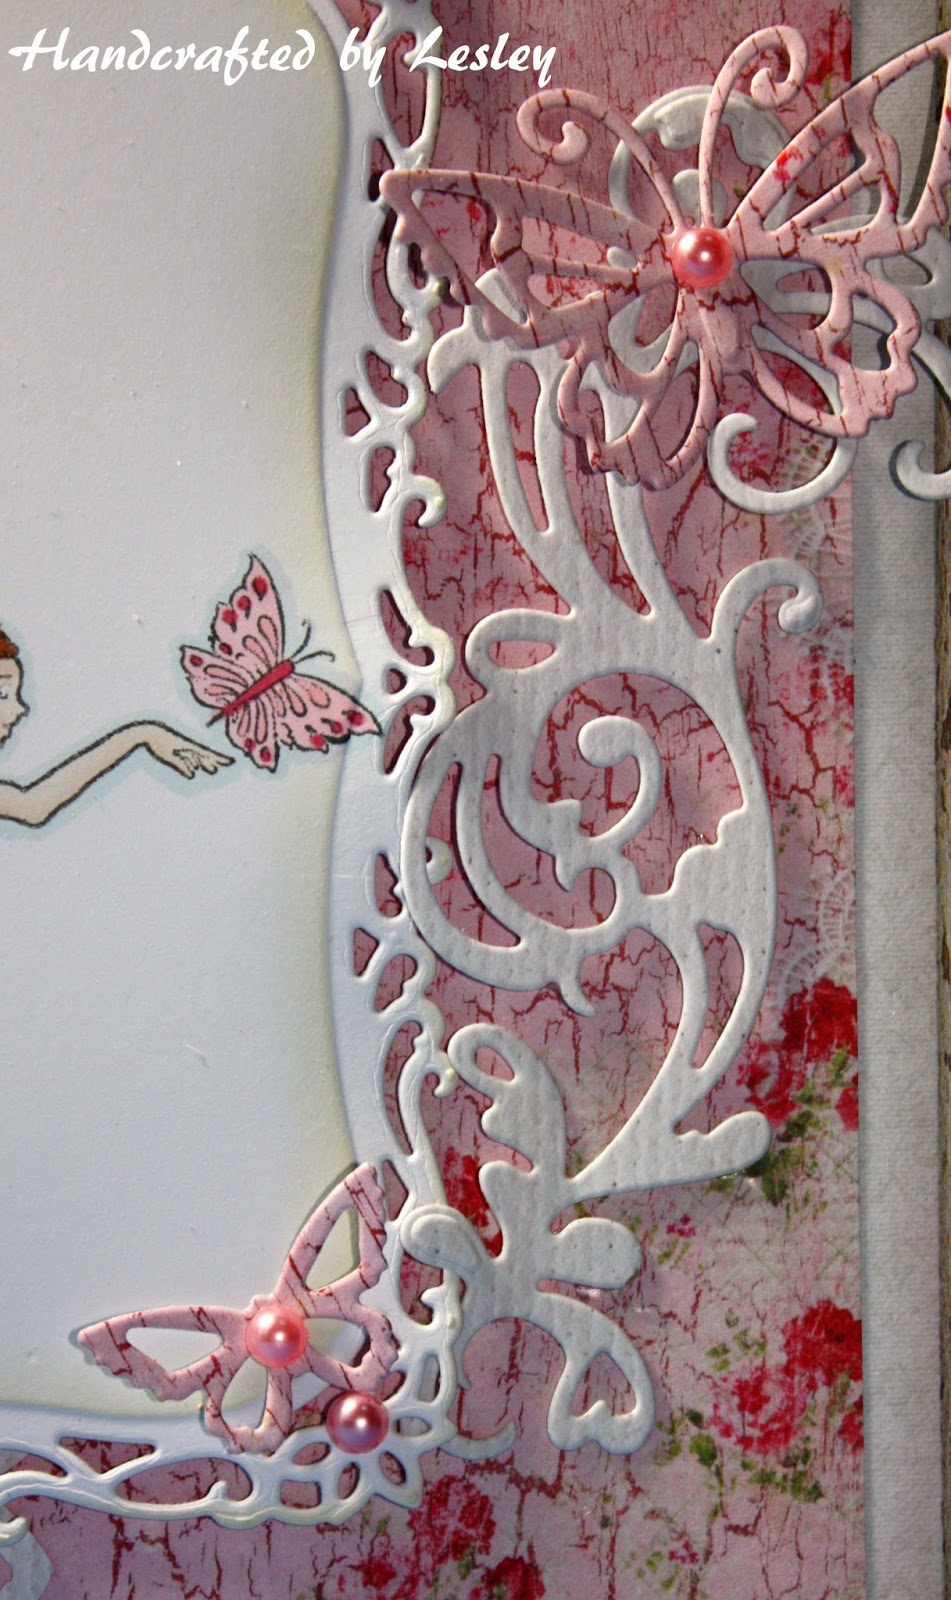
I began by matting and layering a 6 inch card blank with papers from First Edition's Boho Chic paper pad. I cut 3 different papers with Spellbinder's bracket borders 2, added them to the card base and wrapped a piece of peach satin ribbon (from the Ribbon Girl) around the card. The image is a Mo Manning stamp called Veronica which I coloured with the following Promarkers - 
  • skin - satin, blush, dusky pink and coral
  • hair - raw sienna, burnt sienna and henna
  • dress and shoes - soft peach, peach and mango
  • bag and parcel - oatmeal, apricot, spice, burnt orange, mandarin and copper (metallic marker)
  • shadows - pastel blue, warm grey 1 and warm grey 3
I cut the image out using Spellbinder's Grand decorative circles 1 and inked whist still in the die with scattered straw distress ink. I attached it to the card base using foam pads. I then cut a Die'namics plentiful petals and 2 flourishes and attached them to the card. I added a pearl to the centre of the flower.
I stamped 2 sentiments from LOTV's sentiment tags (set 24), cut them out and added them to the top corner of the card.

Now for the handbag - 
I made the bag from a Docraft's template which I have had for years and never used (tsk, tsk) and a paper from the Boho Chic paper pad. I followed the instructions and was really pleased with the result. I left the sides open so I could pop a small present into the box.
To finish I added a Die'namics plentiful petals flower, a flourish, a pearl and another sentiment from the sentiment tags set.

I would like to enter this card and bag into the following challenges -
http://ilovepromarkers.blogspot.co.uk - #208 use die cuts and no punches
http://www.theribbongirlchallengeblog.blogspot.co.uk - March card challenge - Birthdays

Thank you for stopping by.

Lesley