Friday, 28 November 2014

Something for those difficult times

Good morning everyone

Today's card is one of those we all dislike making. I unfortunately had to make one recently and here it is - 
I began by cutting the outer two dies of Tonic's twisted twines die set from white centura pearl card. I then matted it onto a piece of silver centura pearl which I then attached to a 6 inch square card blank. I cut another piece of white centura pearl with Tonic's Just a note die set and then embossed it with an Embossalicious embossing folder (I think it is called Regency). I matted this onto a piece of silver centura pearl and attached it to the card base with foam pads.
I cut two Tonic royal ferns from silver centura pearl and attached them to the card base as shown.
I then stamped a sentiment using Papermania's Just to say stamp set and cut it out with Tonic's Just a note die set. I matted this onto silver centura pearl and attached the whole thing to the card base with foam pads. 

A simple card which I think is appropriate for the situation.

Thank you for stopping by.

Lesley

Sunday, 23 November 2014

A new direction

Happy Sunday everyone

I am feeling very sorry for myself at the moment due to  having a chest infection which has really knocked me for six and has kept me out of my craftroom for over a week. (The cards posted this week were all scheduled last weekend). I had to drag myself in there this weekend to make my hubby a card for his birthday. He likes science fiction and fantasy type films so I went in a different direction (for me) and I hope that this fits the bill.
The image is a digi stamp called Sorceress which I won a long time ago in a blog challenge but I can't for the life of me remember where it came from. I don't really like digi stamps as I find that the ink can run but I read somewhere to set your printer to draft and this seems to have worked this time.
I coloured the image with the following Spectrum Noir pens and pencils - 
  • FS2, FS3, TN2, CR1, CR2, CR8, CR10, CR11, DR1, DR5, DR7, TN7, TN8, EB8, GB8, GB10, EB5, CT4, GB5, OR1, IG1, BG8, BG10, 017, 033, 024, 104, 087, 009 and 089.
I then trimmed the image, inked the edges with antique linen distress ink and matted and layered it onto black and red card. I made a card blank from another piece of black card and attached the topper to the card blank as shown.
The sentiment is from LOTV's scroll sentiments which I cut out with Spellbinder's resplendent rectangles and matted and layered onto another of the dies in the set.
To finish I added an insert and some gems.

I would like to enter this card into the following challenge - 
http://allsortschallenge.blogspot.co.uk - week 286 - no design papers

Thank you for stopping by

Lesley

Friday, 21 November 2014

With thanks

Hello folks

A quick and simple card today - 
I began by cutting a piece of white centura pearl with a Tonic layering square, embossing it with an Embossalicious embossing folder and matting it onto a piece of pink centura pearl. I cut another piece of pink centura pearl with a Tonic border punch, attached to the card and then attached the whole thing onto a 6 inch square scalloped card blank.
The image is from LOTV's Beautiful blooms art pad which I cut out with a Spellbinder's matting basics A, inked whilst still in the die with tumbled glass distress ink and matted onto a piece of pink centura pearl. I attached it to the card  with foam pads.
The sentiment is from LOTV's circular sentiment set which I cut out with a Spellbinder's circle nestie, matted onto a scalloped circle nestie and attached to the card with foam pads.
To finished I added 2 Spellbinder's butterflies with pearls on their bodies.

Thank you for stopping by to read my blog

Lesley

Wednesday, 19 November 2014

Thank you for your lovely gift

Hello everyone

Another quick and easy card today - 
The image is from a LOTV art pad called Beautiful blooms which I cut out with a Spellbinder's circle nestie and matted onto a Spellbinder's scalloped circle nestie.
The background was made using a piece of white centura pearl and an Embossalicious embossing folder, then matted onto a piece of pink card.
The sentiment is from LOTV's mixed circular sentiments which I cut out with a circle nestie and matted onto a scalloped circle nestie.
The bow has been made using a Tonic die (I treated myself to a few new die sets from Tonic, well there were on 4 flexis so it would have been rude not too).

Thank you for stopping by

Lesley

Tuesday, 18 November 2014

Thank you

Good morning folks

A very quick post today and a very quick card too - 
I began by cutting a piece of white centura pearl with a Tonic layering square and embossing it with an Embossalicious embossing folder. I then matted and layered it onto a piece of blue card. I cut another piece of the blue card with a Tonic border punch and attached it to the card. I then attached the whole thing to a 6 inch square scalloped card blank.
The image is from a LOTV art pad. I really struggle colouring florals so these little pads are a great idea. I think this pad is called Beautiful blooms. I cut the image out with another Tonic layering square, inked whilst still in the die with tumbled glass distress ink and matted and layered  it onto another peice of blue card. I attached it to the card with foam pads.
The sentiment is from LOTV's mixed circular sentiments which I cut out with a Spellbinder's circle nestie and matted onto a Spellbinder's scalloped circle nestie. I attached it to the card with foam pads.
To finish I added a Spellbinder's butterfly with a tiny gem on.

Thanks for stopping by today

Lesley

Tuesday, 11 November 2014

All shopped out

Good evening everyone

I spent a lovely afternoon this weekend colouring lots of images with my pens and pencils. Today's card features one of those images - 
I began by cutting a Tonic layering square using a paper from LOTV's Twas the night paper pad. I then added a checked piece of paper from the pad to one side and then matted and layered the whols thing onto a piece or red Bazzil card. I added a piece of green saddle stitch ribbon (from the Ribbon Girl) to the cover the join. 
I then attached the whole thing to a 6 inch scalloped card blank.
I cut two Memory Box snowflake corners from each of the papers and attached them to opposite corners of the card adding pearls to decorate.
The image is Jenny - all shopped out from LOTV which I coloured with the following Promarkers - 

  • Jenny - warm grey 1, warm grey 2, warm grey 3 and black
  • hat and scarf - berry red, ruby, crimson, holly and pine
  • parcels - berry red, crimson, holly, pine, apple cider, herb garden, ivory, pastel beige and khaki
  • sky -pastel blue
  • snow - icicle
I cut the image out with a Spellbinder's circle nestie, inked whilst still in the die with tumbled glass distress ink and matted onto a Spellbinder's stately circle cut from red Bazzil card. I added lots of glitter to the hat, snow and parcels and some glossy accents to Jenny's nose. I attached the image to the card with glue gel.

To finish I added a sentiment from LOTV's winter wishes stamp set which I matted onto a piece of red Bazzil card and then attached to the card base with glue gel.
I would like to enter this card into the following challenges - 
http://ribbongirls.blogspot.co.uk - lovely Lili challenge - make a Christmas card

Thank you for stopping by

Lesley


Sunday, 9 November 2014

Three Christmas mice

Hello everyone, happy Sunday

I finally got to spend some time in my craft room this weekend and here is one of the cards I made - 
I began by cutting a paper from Bobunny's Elf magic paper pad with a Tonic layering square die which I then matted onto a piece of blue Bazzil card. I added some blue velvet ribbon to one side of the base and then attached some lace and pearl trim (both from the Ribbon Girl) onto the top of the ribbon. I then attached it to a 6 inch scalloped card blank.
I cut a Memory Box frostyville corner from white card and added it to the top corner of the card base.
The image is Penny Black's Caroling Trio which I coloured with the following Promarkers - 
  • mice - ivory, mustard, raw sienna and sunkissed pink
  • scarf - denim blue, cloud blue and cadet blue
  • lantern - terracotta, burnt umber, walnut, orange, gold, canary, tulip yellow, ivory, pastel beige and khaki
  • snow - icicle
  • sky -pastel blue

I cut the image out using Spellbinder's Grand decorative ovals, inked whilst still in the die with tumbled glass distress ink and matted onto a Spellbinder's oval nestie cut from blue Bazzil card. I attached the image to the card base with glue gel.

To finish I cut 3 memory box snowflakes from white card, attached them to the card base and then added a pearl (from the Ribbon Girl) to the centre of each one.

I would like to enter this card into the following challenges - 
http://pennyblackatallsorts.blogspot.co.uk - November challenge - Anything goes

Thank you for stopping by

Lesley

Saturday, 8 November 2014

Golden wedding commission

Good morning everyone

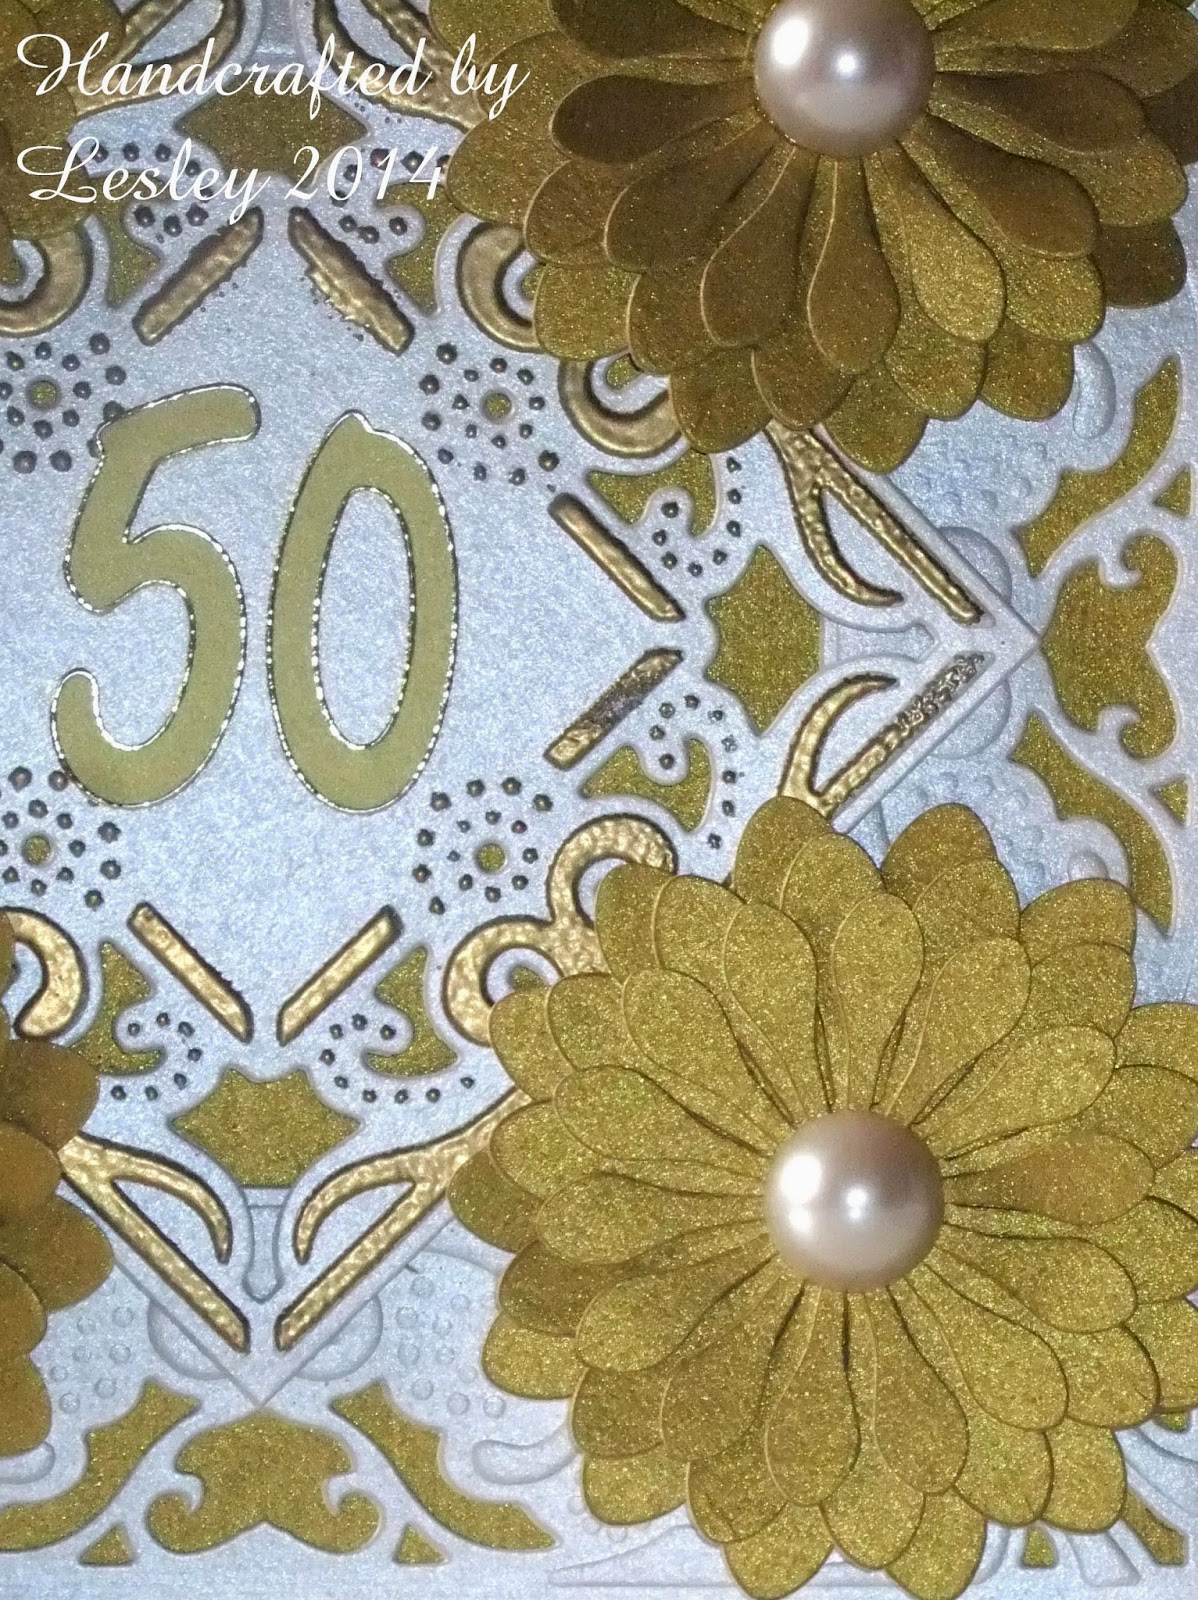
Today's card is a commission that a completed a while ago -
I began by making a card base using ivory centura pearl and a Die'sire create a card die called Decadance. I placed a piece of gold centura pearl behind the die cut and glued in place. I took the centre part of the die and put it back into the die so I could rub Versamark over it. I removed it from the die and covered the die cut with gold embossing powder which I then heat embossed. I attached it to the centre of the card on the point with foam pads and added a gold 50 peeloff.
I then cut 4 Die'namics petal flowers, layered them up and added a pearl to the centre. I attached them to the corners of the card as shown.
I added a white insert to the inside of the card to finish.

Thank you for stopping by

Lesley

Sunday, 2 November 2014

Forever Christmas

Hello everyone

Can you believe that it is the first Sunday in November - where did October go? I am back to work tomorrow after a week's holiday - not sure where that week went either.
Today's card is a result of me playing with my Spectrum Noir pencils. I have used them previously on watercolour card and I wanted to see how they would perform on Elegant Satin stamping card. I have to say I am rather pleased with the result. I did put some copy paper under the image whilst I coloured it to absorb the blending solution after watching Leann Chivers on Create and Craft the other week. Anyway enough of me rattling on, here is the card
I began by cutting a Tonic layering square from a paper from Docraft's Kraft notes paper pad (bought in the sale at the Glitter Pot) and matting it onto another paper from the pad. I cut a rectangle from a 3rd paper from the pad, cut 2 holly corners using  Spellbinder's Holly accents die set and attached them to the card as shown. I then attached the whole thing to  a 6 inch scalloped square card blank.
The image is from Docrafts. I cannot find its name anywhere on the stamp and it was one I got in the sale at the Glitter Pot so I can't find any information on their website either. Sorry. As I have previously said I coloured the image with my Spectrum Noir pencils which are from the Primaries and the Essentials sets - 
  • bear - 084, 107 and 087
  • coat - 024, 027, 033 and 117
  • gloves - 056, 058 and 047
  • robin - 096, 099 and 024
  • cup - 089, 091 and 095
  • snow - 112 and 117
  • sky - 065, 066 and 068
I cut the image out using a Spellbinder's circle nestie, inked whilst still in the die with tumbled glass distress ink and then matted onto a Spellbinder's scalloped nestie. I then added some glitter to the snow. I attached the whole thing to the card base with foam pads.
I stamped a sentiment from LOTV's Christmas wishes stamp set, cut it out with a scalloped circle nestie, inked whilst still in the die with tumbled glass distress ink and attached to the card base with double foam pads.
To finish I added some red dew drops (from the Ribbon Girl) to the holly corners.

I would like to enter this card into the following challenges - 
http://ribbongirls.blogspot.co.uk - November card challenge - Christmas
Spectrum Noir facebook challenge - Christmas / Winter

Thank you for stopping by

Lesley

Saturday, 1 November 2014

Birthday wishes

Hello folks


Today is my youngest son's 10th birthday and here is the card I made for him - 

I began by cutting a Tonic layering square from a piece of stripey paper from Papermania and then matting and layering it into rainbow mirri and red card. I then cut another square from the die set from a blue spotty paper again from Papermania and matting and layering it onto rainbow mirri and red card then attaching it to the stripey paper at a jaunty angle. I then attached the whole thing to a 6 inch square card base.
The image is No. 7 bear from LOTV which I coloured with the following Promarkers - 

  • bear - warm grey 1, warm grey 2, warm grey 3 and coral
  • football shirt - berry red, ruby and crimson
  • bench - caramel, raw sienna and cocoa
  • background - ivory, pastel beige and khaki
I cut the image out with Spellbinder's matting basics A, inked whilst still in the die with antique linen distress ink and matted and layered onto rainbow mirri and red card. I then attached it to the card base with foam pads.
The sentiment is from LOTV's sentiments to fit scroll stamp set which I cut out with a Die'namics mini tabs quartet die set. I attached it the side of the image.


Thank you for stopping by

Lesley