Saturday 28 February 2015

Hip, hip hooray it's your birthday

Good morning folks

Normal service is resumed today with a lovely cute card using LOTV's Cheerleader stamp yet another stamp I haven't yet used - rapped knuckles!
I began by cutting a Tonic layering square from some white hammered card which I then embossed with a Tattered Lace butterflies embossing folder. I then matted the square onto a piece of yellow and then a piece of blue core'dinations. I wrapped a piece of blue spotty ribbon (from the Ribbon
Girl) around the embossed card and then matted it onto a 6 inch square card base which I had covered with a piece of light blue core'dinations.
As I said the stamp is Cheerleader from LOTV which I coloured with the following Spectrum Noir pencils -
  • hair - 096, 099 and 104
  • skin - 003, 005, 004 and 034
  • dress, pom poms and boots - 065, 066, 068, 015 and 017
  • grass - 065, 058 and 047
  • sky - 067

I cut the image out with a Tonic layering square, inked whilst still in the die with tumbled glass distress ink and then matted and layered onto yellow and then blue core'dinations. I attached the topper to the card with foam pads.
I then cut a LaLa Land hearts banner from each of the core'dinations, shadowed them on top of each other and attached it to the top of the card as shown.
I added a bow to the card base as shown and then added the 'waste' hearts from the heart banners.
I would like to enter this card into the following challenge - 
http://christmasblogchallenge.blogspot.co.uk - tie a bow

Thank you for stopping by.

Lesley

Friday 27 February 2015

Another teenage birthday

Hello Folks

Yes yet another teenage birthday. I tried something a little different but I am not sure if I like it. Grunge is definitely not my style.
 I began by embossing a piece of black core'dinations with a brick embossing folder from Do-crafts and sanded it back to reveal the core. I cut out a piece of brickwork in the centre of the card. I then stamped and heat embossed with white embossing powder words stamps from Crafter's Companion's Textures words of wisdom randomly over the black card. I was hoping for a graffiti look but not sure I achieved that.

I then embossed a piece of grey core'dinations with a canvas embossing folder from Crafter's Companion and then sanded it back to reveal from the core. I matted the black card onto the grey core'dinations and added some brads in the corners.
I stamped and heat embossed another word from the stamp set using copper embossing powder. I cut it out, added some black soot distress ink and attached it to the card so it looked like it was coming out of the brickwork. I used Pinflair to add dimension.
I made a card blank using a piece of A4 black centura pearl card and my Ulimate Pro, then attached the topper to the card base.

Thank you for stopping by

Lesley

Wednesday 25 February 2015

Teenage birthdays

Good morning everyone

I have a number of teenage birthdays over the next fortnight which are not my favourite type of cards to make. I um-ed and ah-ed about it for a while and then decided to take the plunge and buy a new die (not easy I know for a die-a-holic but I was very brave!!). I bought a create a card die from Crafter's Companion and here are the cards I made - 
I began by cutting the die twice, once from grey core'dinations and once form red core'dinations. I then embossed a piece of black core'dinations using a canvas embossing folder from Cratfer's Companion which I sanded back to reveal the core. I matted the grey die cut onto the black card and then onto red card.
I then cut up the red die cut to free the sentiment which I then applied to the grey base leaving a slight shadow. Using the 'waste' from the die cut I infilled some of the stars.
I attached the whole thing to a 7 inch square card blank.
I was pleased with the way this one turned out so decided to make this card in other colourways too - 

Thank you so much for stopping by 

Lesley

Tuesday 24 February 2015

16th birthday celebrations

Hello folks

Today is my son's 16th birthday and here is the card I made for him - 
This one proved quite difficult to photograph so this post is rather photo heavy.
I began by making an exploding box card from black core'dinations using instructions I found at Split Coast Stampers
I matted and layered the card using papers from Do-crafts chronology paper pad and some silver centura pearl. 
To decorate I used stamps from Crafter's Companion's Textures words of wisdom set 1 and 2 which I embossed in silver embossing powder.
 And cogs cut from craft metal using Spellbinder's spritely sprockets.
As you can see I really went to town embellishing this card!
To finish I added a sentiment cut from craft metal using Spellbinder's sentiment dies 2.

A huge Happy Birthday to Liam. I am still struggling to comprehend that I am the mum of 3 teenagers, not entirely sure where the last 16 years have gone. It seems only yesterday that he was born.

 Thank you for stopping by

Lesley

Monday 23 February 2015

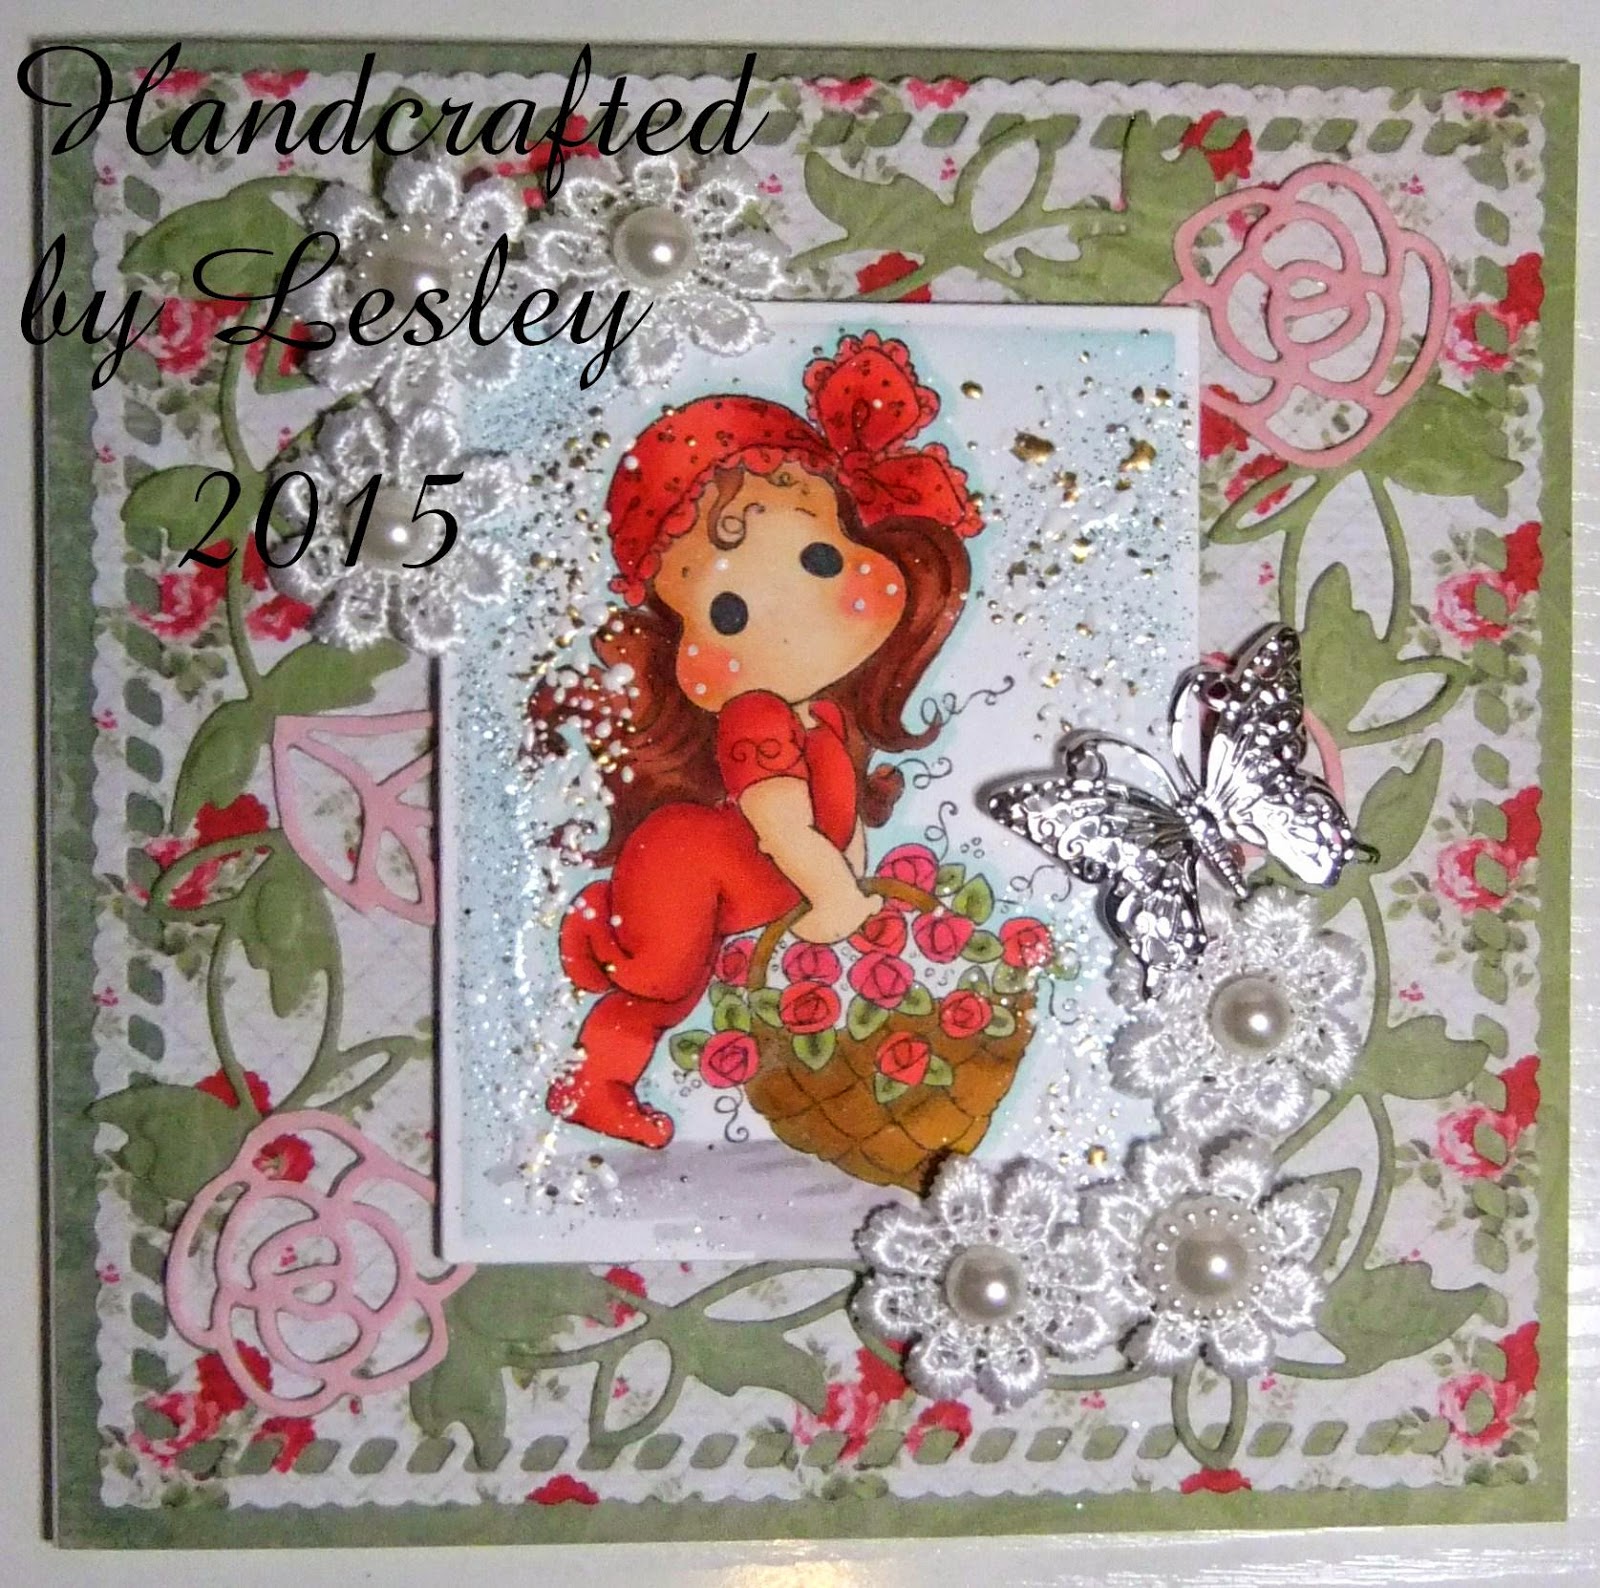
Add lace

Good morning folks and a very happy Monday to you all.


Back to work for me today so this is a scheduled post of another of the cards during yesterday's lock-in in my craft room.

I began by covering a 6 inch card blank with a paper from LOTV's Heartfelt paper pad. I then cut a Tonic Twisted twine square from another of the papers and attached it to the card base.
I cut two Tonic rose deco frames, one from a pink paper from the pad and another from a green paper. I then cut the rose from the pink frame and added them to the green frame, and then attached it to the card base.
The image is Magnolia's Tilda with a rose basket which I coloured with the following Spectrum Noir pens and pencils - 

  • hair - TN4, TN6, TN7 and 096
  • skin - FS1, TN1, TN2, TN3, 089 and CR1
  • clothes - CR8, CR10, CR11 and 033
  • basket - GB7, GB9, GB11, 087 and IG1
  • roses - DR2, DR4, CR10, CR11, CG3, DG2 and DG4
  • ground - BG2 and BG4
I cut the image out with a Spellbinder's rectangle nestie and inked whilst still in the die with tumbled glass distress ink. I then added some antique blue frantage and attached the topper to the card base with foam pads.

The challenge at the Ribbon Girl this week is to add lace but I didn't want to add a strip of lace as it would cover up the die cut so I cut a piece of flower lace (from the Ribbon Girl) into individual flowers and arranged them as shown. To finish I added some pearls to the centre of the flowers and a silver butterfly charm again from the Ribbon Girl.

I would like to enter this card into the following challenges - 
http://ribbongirls.blogspot.co.uk - add lace magnolia only challenge
Spectrum Noir facebook challenge - use red

Thank you for stopping by

Lesley

Sunday 22 February 2015

The colour purple

Hello folks.

A very happy Sunday to you all. I am off back to work tomorrow so I have been spending most of the day in my craft room. Here is one of the cards I have made today - 
I began by embossing a piece of white hammered card with a Tattered Lace spring embossing folder and then matting and layering onto lilac and purple core'dinations.
I wrapped some lace and purple satin ribbon (from the Ribbon Girl) around the centre of the card and attached the whole thing to a 8 inch square card blank.
The image is Breeze from Saturated Canary which I coloured with my Spectrum Noir pens and pencils - 

  • hair - LV1, LV2, LV3 and 077
  • skin - FS1, TN1, TN2 and 089
  • dress - IG2, IG4, IG6, 114, PP2 and 041
  • lips - CR1, blender and 009
  • eyes - TB1
  • sky - IB1
I cut the image out with a Spellbinder's oval nestie, inked whilst still in the die with tumbled glass distress ink and then matted it onto a larger oval cut from lilac core'dinations. I then matted the image onto a Spellbinder's grand decorative oval cut from purple core'dinations. I attached them onto the card base with Pinflair.

The sentiment is from LOTV's happy circular sentiments which I cut out with a Spellbinder's circle nestie and then matted and layered onto a larger circle and a scalloped circle cut from lilac and purple core'dinations.
I made a little flower arrangement using flowers from the Ribbon Girl and attached them to the card base as shown.
To finish I added some pearls which I coloured with a LV3 Spectrum Noir pen.
I would like to enter this card into the following challenge - 
http://allsortschallenge.blogspot.co.uk - week 299 - the colour purple

Thank you for stopping by

Lesley

Friday 20 February 2015

Saddle up

Hello folks

Well I can't believe my half term break is nearly over. I haven't done any college work but have spent some time in my craftroom. I have been making teenage boy cards (details of those to follow) so needed a girlie break -
I am ashamed to say that this lovely little stamp has been sitting in my stamp box unstamped for a long time but I wish I had stamped her earlier - she's lovely.
I began by covering a 6 inch square card blank with a piece of lime core'dinations. I then matted and layered several papers from LOTV's One Birdie Lane paper pad (bright and zingy aren't they?) along with the lime core'dinations onto the card base. I made a border from another of the papers using a Martha Stewart and attached it to the centre of the card as shown.
The stamp is LOTV's Annabel - saddle up which I coloured with the following Promarkers -

  • hair - raw sienna, cocoa and burnt umber
  • skin - satin, blush and dusky pink
  • clothes - pastel beige, khaki, mango, bright orange, heatwave, cerise, antique pink and gold
  • hat - cerise, salmon pink, antique pink and gold
  • saddle and boots - warm grey 5, saddle brown and burnt sienna
  • sky - pastel blue
  • ground - warm grey 1 and warm grey 3

I cut the image out using a Tonic layering square, inked whilst still in the die with tumbled glass distress ink and matted onto a piece of lime core'dinations. I then attached the topper to the card with foam pads.

I cut a Memory Box button flower from scraps of the papers and attached to the card as shown.
To finish I stamped a sentiment from LOTV's sentiments to fit scroll and cut it out with Die-namics mini tabs. (Just noticed that dirty mark - not sure where that has come from. Note to self - clean hands after stamping!) I attached it to the side of the card as shown.

Thank you for stopping by

Lesley

Sunday 15 February 2015

Be my Valentine

Hello everyone

A very happy Sunday to you all. Yes I know I am a day late but better late than never. The challenge at Magnolia Down Under is Valentines with a twist - NO RED so I thought PINK - 
I began by covering a 6 inch square card blank with a piece of pink paper from LOTV's Butterfly kisses paper pad and then I cut a Tonic layering square from another of the papers, rounded the edges with a Martha Stewart punch and attached it to the card base. I made a border with another of the papers, cut one edge with a Spellbinder's classic petal border punch, matted it onto a stripey paper from the pad and wrapped some ribbon (from the Hobby House) around the centre. I then attached the whole thing to the card base as shown.
The image is You are my Valentine Tilda which I coloured with a combination of the following Spectrum Noir pens and pencils - 
  • skin - FS1, FS3, FS8, CR1 and 089
  • hair - GB4, GB6, GB7, EB3 and 101
  • clothes - BP6, BP7 and 040
  • heart - PP1, PP2 and 036
  • chocolates - CG2, CG3, CG4 and 063
  • arrows - EB2, EB3, BP6, BP7, CG2, CG3, CG4, 063, 040 and 101
  • wings - TN1, TN2 and 009
  • ground - BG1 and BG3
  • sky - IB1

I cut the image out with a Die-namics stitched circle, inked whilst still in the die with tumbled glass distress ink and matted onto a Spellbinder's heart circle. I attached the topper to the card with foam pads.

I added a bow, a heart charm and a wooden heart button to the side of the topper. (The charm and button are from the Ribbon Girl)
To finish I cut a sentiment using Spellbinder's sentiments 2 and attached it to the bottom corner of the card.

I would like to enter this card into the following challenge - 
http://magnoliadownunderchallenges.blogspot.co.uk - Challenge 253 - Valentines with twist-no red
http://fantasystampers.blogspot.co.uk - Pretty in pink (stamp used - Magnolia's Be my Valentine Tilda)
http://inthepinkchallenge.blogspot.co.uk - love is in the air

Thank you for stopping by

Lesley

Wednesday 11 February 2015

Hanging around

Hello Folks

Happy hump day. Down hill now till half term - yipee although I have a lot of college work to do during my week off. Hopefully I will have a little craft time to.
Here is today's card - 
I began by covering a 6 inch square card blank with a paper from LOTV's petal fresh paper pad. I then cut a square of another paper (using a Tonic layering square), embossed it with a Crafter's Companion cloud embossing folder, inked the edges with tumbled glass distress ink and then matted it onto another paper from the pad. 
I wrapped a piece of blue satin ribbon (from the Ribbon Girl) around the paper and then attached this to the card base.
The image is Annabel upside down from LOTV which I coloured with the following Promarkers -

  • hair - praline, saddle brown and burnt sienna
  • skin - stain, blush and dusky pink
  • clothes - denim blue, polar blue, twilight sky, midnight blue, royal blue and reef blue
  • tree and grass - chestnut, walnut, holly and pine
  • dog - ice grey 1, ice grey 3, ice grey 4 and ice grey 5
  • sky - pastel blue and denim blue
I cut the image out with a Tonic layering square, inked whilst still in the die with tumbled glass distress ink and matted onto a paper from the paper pad. Then I attached the topper to the card base with foam pads.

I tied a heart charm onto a piece of blue baker's twine and glued it to the ribbon as shown, and then a made a bow of narrower blue stain ribbon and attached it to the top of the baker's twine. (All ribbons, twine and charms are from the Ribbon Girl)
I stamped 2 sentiments from LOTVs sentiment tags stamp set, cut them out and attached them to the card as shown.

I would like to enter this card into the following challenge - 
http://ribbongirls.blogspot.co.uk - Lovely Lili challenge -It's charming

Thank you for stopping by

Lesley

Sunday 8 February 2015

How old.......?

Hello folks

Happy Sunday to you all.

Today's card is one I made for my brother in law -
I began by making a card blank with a piece of A4 Ivory centura pearl and my ultimate pro. I then made 3 frames using my new toy, a Martha Stewart punch and papers from LOTV's On a high note paper pad.
The image is Penny Blacks A little bird which I coloured with the following Spectrum noir pencils -
  • Cat - 097, 098, 110, 003 and 005
  • Ladder - 026, 030 and 093
  • Cage - 114, 115 and 116
  • Feathers - 010 and 017
  • Sky - 065 and 066
  • Ground - 114
I cut the image out using a Spellbinder's matting basics A and inked whilst still in the die with tumbled glass distress ink. I then added the outer frame to the image and then matted with the other two frames. I attached the topper to the card base.
I stamped one of the sentiments from the stamp set, cut it out with a Spellbinder's circle nestie and matted it onto a larger nestie cut from one of the papers in the pad. I attached it to the card base with foam pads.
To finish I cut a Happy Birthday sentiment using Spellbinder's sentiments 2 and attached it to the top of the card as shown.

I would like to enter this card into the following challenge -
http://pennyblackatallsorts.blogspot.co.uk - February challenge -anything goes except a digi 

Thank you for stopping by

Lesley