Wednesday 31 December 2014

Happy New Year

Happy New Year everyone

Wishing you all good health, wealth and happiness for 2015.


Very best wishes

Lesley

Saturday 27 December 2014

Top 5 Christmas cards of 2014

Hello everyone

I hope you all had a good Christmas and are not suffering too much with over indulgence. I have a lovely time with my family and have eaten far too much and the house is still groaning with food. Oh well back to the diet in January.
Debby over at My Scrapjourney would like to see your favourite top 5 Christmas cards. These must be made by you and in 2014 so here are my top 5.
One from LOTV
And of course a Penny Black one - 
And another one - 
Must include Tilda too - 
And finally -
These are my favourites. Why not take a look at your 2014 Christmas projects and join in with the fun at

Now I am off to strip the turkey. Thank you for stopping by

Lesley

Wednesday 24 December 2014

I don't believe it..............

Hello. 

Yes It's me again. Can you believe it?  I think this must be a record for me! 3 posts in one day but this is the last one I promise. My last card for my boys - 
A clean and simple one to finish with.
I stamped Crafter's Companion's Bebunni Figgy Pud onto a Tonic layering square and coloured it with the following Spectrum Noir pens and pencils - 
  • Bebunni - IG2, IG3, IG4, IG5, PP1, 117 and 119
  • pudding - EB3, EB4, EB6, EB8, DR1, DR6, DR7, EB2, EB3, 104 and 107
  • holly - DR1, DR6, CG3, LG5, 033 and 047
  • sky - IB1 and 061
  • ground - BG1 and BG3
I added a little glitter to the image and inked around the edge with tumbled glass distress ink. 
I stamped one of the sentiments from the set, added a holly charm and a red ribbon bow.

I am going to enter this card into the Spectrum Noir Facebook challenge.

Well that's all from me for now. all that remains is to wish you all a very Merry Christmas and a Happy New Year. Thank you so much for all the support this year and I look forward to sharing more of my cards with you all next year.

Lesley

Two in one day

Hello again

As it is nearly Christmas I thought I would spoil you and do 2 posts in one day. This card is another I made for my boys - 
I began by covering a 6 inch square card blank with red Bazzil card. I then cut a piece of paper (from my Christmas stash - I've had it for ages so not really sure which company made it) with Tonic's twisted twine square outer die and Tonic's Square base Affections inner die and wrapped apiece of ribbon (from the Ribbon Girl) around the centre. I then attached this to the card base.
The image is Penny Black's Warm wishes which I coloured with the following Promarkers - 

  • cat - ice grey 1, ice grey 2, ice grey 4 and dusky rose
  • dog - sandstone, tan, cinnamon, burnt sienna, true blue, azure and a gold gel pen
  • stockings - red, berry red, crimson, holly, pine, lavender, orchid, amethyst and azure
  • presents - lavender, orchid, amethyst, berry red, crimson and canary
  • fire and fireplace - warm grey 1, warm grey 3, warm grey 5, canary, gold, tequila sunrise and heatwave
  • candles - ivory, pastel beige, tulip yellow, canary, gold and heatwave
  • holly - berry red, pine and holly
  • rug - canary, gold, tequila sunrise and heatwave
I cut the image out using a Tonic layering square, inked whilst still in the die with tumbled glass distress ink and matted onto a piece of red Bazzil card. I then attached the topper to the card base with foam pads.
I stamped the sentiment which comes in the set, cut it out and then matted it onto a piece of red card.

I would like to enter this card into the following challenges - 
http://pennyblackatallsorts.blogspot.co.uk - special occasions
http://ilovepromarkers.blogspot.co.uk - challenge 250 - anything goes (3rd entry)

Thank you for stopping by

Lesley

It's beginning to look at bit like Christmas...............

Hello everyone and a very happy Christmas Eve to you all,

Today's card is one I made for one of my boys - 
I began by covering a 6 inch square card blank with a piece of dark blue core'dinations.
The image is Penny Black's Sweet snowman which I coloured with the following Spectrum Noir pens and pencils - 
  • hat and scarf - TB1, TB2, TB4, TB6, TB7, TB9, 066 and 073
  • snowman - BGR1, BGR2, OR1 and OR3
  • present - TB1, TB6, GB3, 065, 068 and 073
  • snow - BGR1 and BGR2
  • sky - IB1 and 061
  • tag - IG1

I cut the image out with a Tonic layering square, inked whilst still in the die with tumbled glass distress ink, added lots of glitter and then matted it onto a piece of pale blue Bazzil card. 
I stamped a Penny Black snowflakes sentiment into the top corner. I then attached the topper to the card base with foam pads.
To finish I cut 2 Spellbinder's snowflakes and added blue pearls to the centre of each snowflake.

I would like to enter this card into the following challenges - 
Spectrum Noir Facebook challenge - clean and simple

Thank you for stopping by

Lesley

Tuesday 23 December 2014

With love at Christmas time

Hello and a very happy Christmas eve eve,

Are we all ready? Have you braved the shops for all your festive food or are you very organised? I have virtually everything now except fresh fruit and veg and bread which I will collect tomorrow morning with my Dad.
I am still frantically making cards and gift boxes and this one is for my hubby - 
I began by cutting a Tonic layering square from a paper from LOTV's Twas the night and matting it onto a piece of red Bazzil card. I made a border from another piece of the red card and punching along one edge with an EK Success punch. I matted a another paper from the pad onto the red and added some red ribbon from the Ribbon Girl. I fixed the border to the holly paper and attached the whole thing to a 6 inch card blank.
The beautiful image is from LOTV and is called Secretly Yours which I coloured with the following Promarkers - 
  • skin - satin, blush and dusky pink
  • girl's hair - praline, saddle brown and burnt sienna
  • boy's hair - henna
  • clothes - poppy, berry red, crimson, sunflower, gold, denim, polar blue and twilight
  • box - caramel, cinnamon and umber
  • present - polar blue, twilight, sunflower and gold
  • sky - pastel blue 
  • ground - warm grey 1 and warm grey 3
I cut the image out with a Die'namics stitched circle, inked whilst still in the die with tumbled glass distress ink and matted onto a Die'sire Chantilly lace stamping frame die cut from red Bazzil card. I then attached the whole topper to the card base with foam pads.
I cut 2 Marianne ivys and a Die'sire mistletoe from white card, coloured them with holly, moss and apple cider Promarkers and attached them to the with Pinflair as shown. I then added 3 pearls to the centre.
To finished I stamped and cut out a sentiment tag from LOTV's sentiment tags (set 24)

I would like to enter this card into the following challenges - 
http://ilovepromarkers.blogspot.co.uk - anything goes (2nd entry)

Thank you for taking time to read my blog.

Lesley


Monday 22 December 2014

White Christmas

Hello folks

How are we all? Stressed or relaxed about the whole thing? I have a fairly easy day today - a little gift wrapping, a hair cut so I look like a human being on the big day and of course some crafting. I have to make some gift boxes for the fudge I made yesterday. My baking marathon went well - 2 dozen mince pies and two lots of fudge complete and hidden so no-one eats it before the big day.
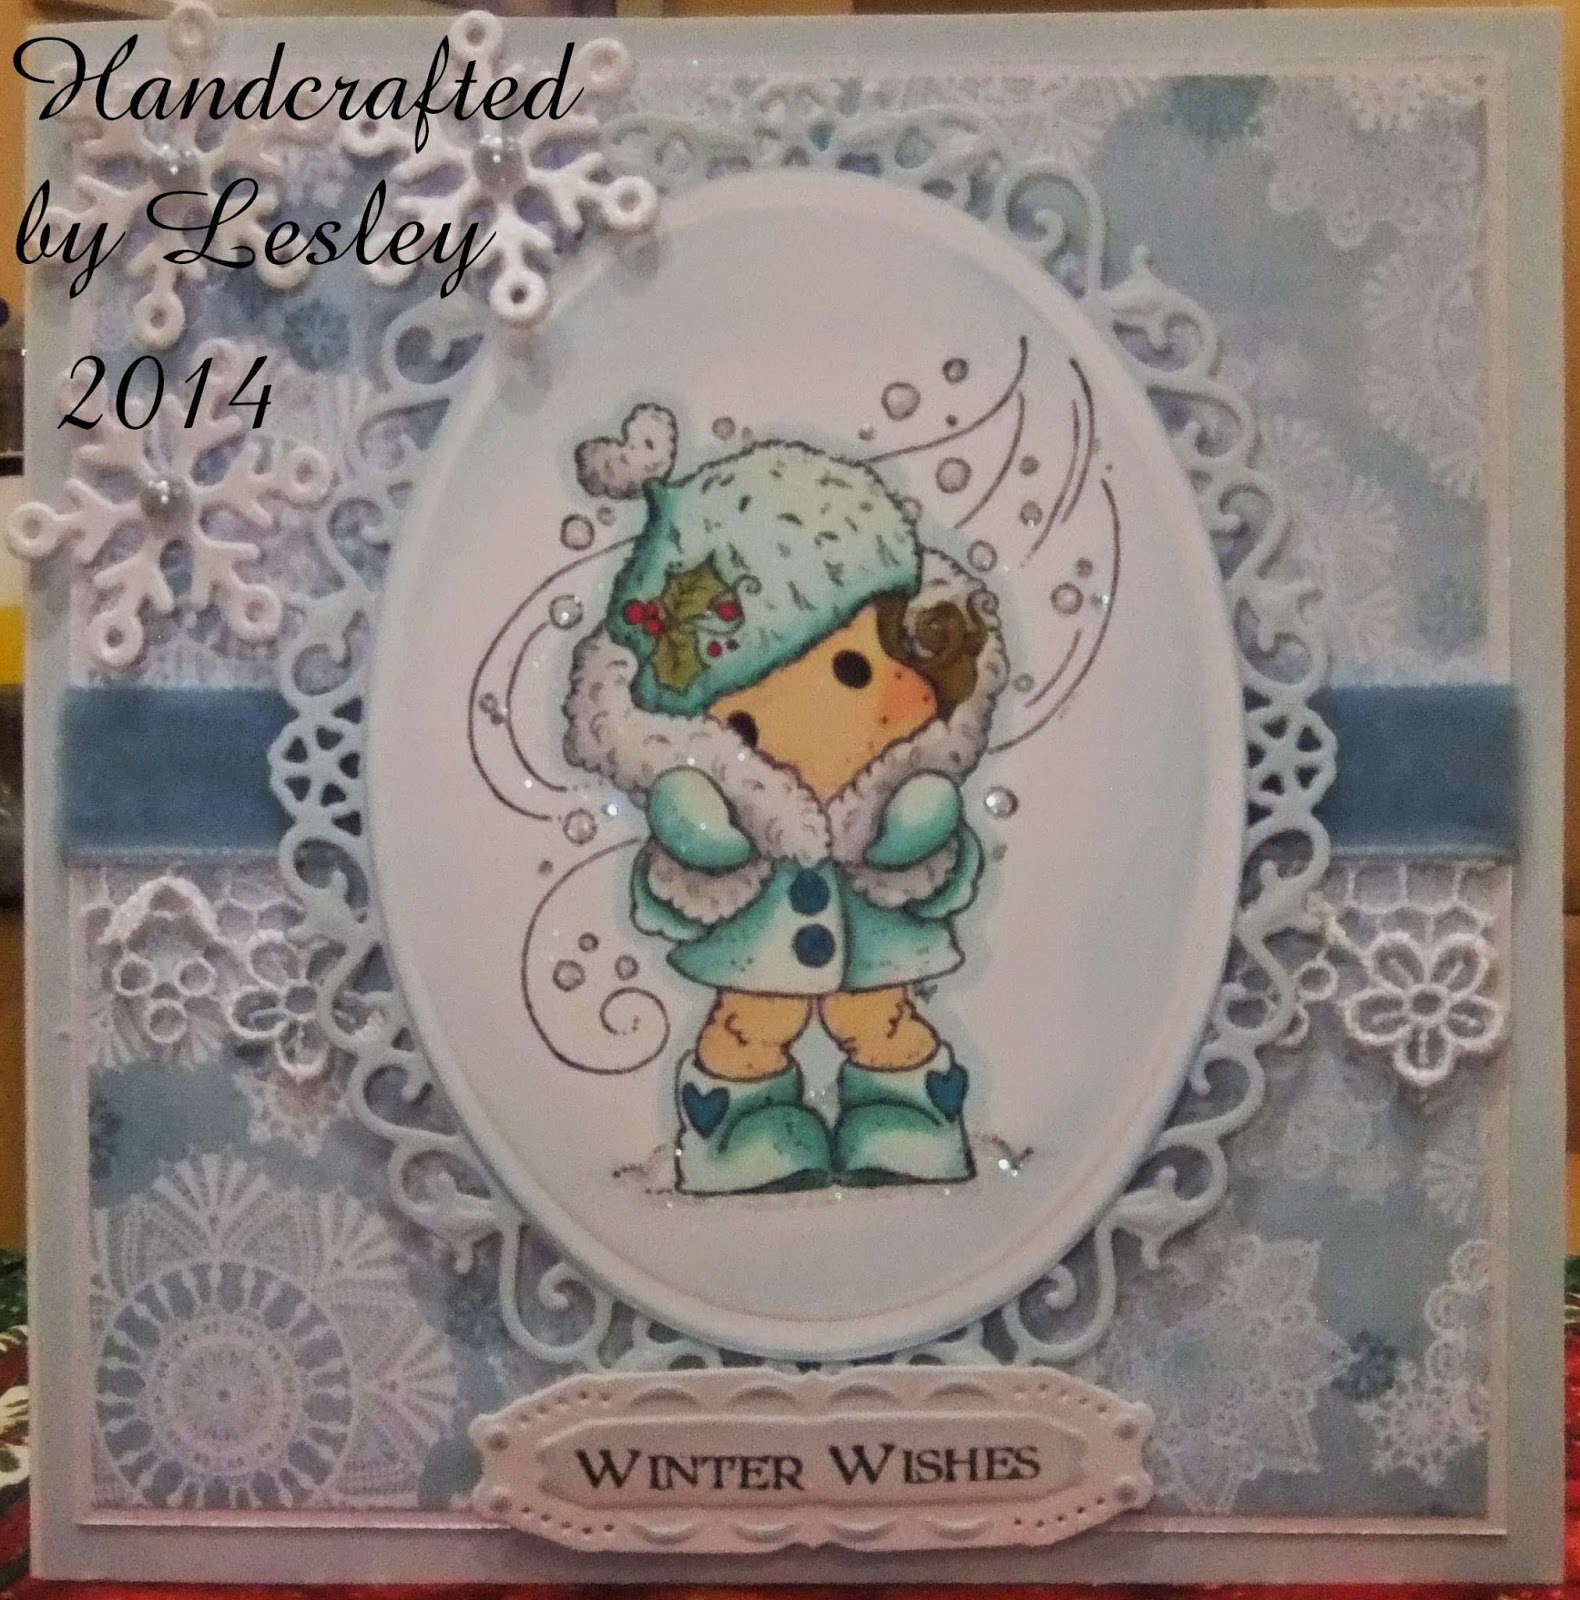
Here is today's card - 
Firstly apologies for the photo quality. My camera really doesn't like mirriboard. It was either have the flash reflecting in the centre of the card or switching the flash off and having a very dark picture.
I began by covering a 6 inch square card blank with silver mirriboard. I then cut a piece of white centura pearl with a Tonic layering square die and embossed it with an Embossalicious snowflake embossing folder. 
I wrapped a piece of silver ribbon (from the Ribbon Girl) around the centre of the card (from top to bottom) and then attached the whole thing to the card base.
I then cut several dies from the mirriboard and white glitter card. I used the following dies - 
Memory Box - Frostyville wreath
Die'namics - stitched circle
Tattered Lace - Merry Christmas
I then layered them together as shown and attached the whole thing to the card base with Pinflair.
I cut several Spellbinder's poinsettia flowers from white glitter card and silver mirriboard and a Marianne ivy die from silver mirriboard. I layered them up, arranged them as shown and added silver gems to the centre of the flowers.
To finish I added a ribbon knot to the top of the topper.

I would like to enter this card into the following challenge - 

Thank you stopping by

Lesley

Sunday 21 December 2014

Fussy and fancy Tilda

Good morning everyone

Well it's complete - all Christmas gifts bought and nearly all wrapped. Now for the cooking marathon which starts today with the mince pies and fudge.
Today's card features another recent purchase from Sir Stampalot - 
I began by covering a 6 inch square card blank with some gold centura pearl. I then cut some cream centura pearl with the outer 2 dies in Tonic's Just a note die set. I then cut another of the dies in this set from gold centura pearl. and a layering square from cream centura pearl. I then layered everything up as shown and attached it to the card base. 
I then added a cream lace corner and a piece of lace and pearl trim (both from the Ribbon Girl).
The image is Swirly Tilda which I coloured with the following Promarkers - 
  • skin - satin, blush, dusky pink and coral
  • hair - raw sienna, terracotta and burnt umber
  • dress - ivory, pastel beige and khaki
  • sky - pastel blue
  • stars - gold gel pen.
I cut the image out using a Die'namics stitched circle die, inked whilst still in the die with tumbled glass distress ink and attached to the card with Pinflair.
I cut a Memory Box Frostyville wreath from gold centura pearl and attached it to the outer edge of the image.
I stamped a sentiment from LOTV's Christmas wishes stamp set. I added a frame made from gold centura pearl and Spellbinders Resplendent rectangles.
To finish I added a little angel charm from the Ribbon Girl to the lace corner.

I would like to enter this card into the following challenges - 
http://ilovepromarkers.blogspot.co.uk - challenge 250 - Anything goes
http://christmasblogchallenge.blogspot.co.uk - fussy and fancy
http://craftyhazelnutschristmaschallenge2.blogspot.co.uk - anything Christmas
http://magnoliadownunderchallenges.blogspot.co.uk - anything goes

Thank you for taking time to read my blog

Lesley

Saturday 20 December 2014

Winter wishes

Hello everyone and a very happy Saturday to you all

Today I am going to be dashing around the shops trying to buy my last minute gifts. Yes I know earlier in the week I said Id finished but I've realised there are some missing so it's off to do battle with the Christmas crowds this morning. Hopefully the weather will be kind so I complete my shopping without getting wet.
Today's card features a new Tilda stamp which is so lovely to colour. It is nice to get my pens out again and do some colouring at last.
Isn't she gorgeous. I love colouring Tilda images.
I began by covering a 6 inch square card blank with a paper from my stash (sorry had it for ages so have no idea who made it). I then cut a square of paper from Bobunny's Elf magic paper pad and matted it onto a piece of white centura pearl. I added a piece of lace and blue velvet ribbon (both from the Ribbon Girl) to the centre and attached it to the card base.
The image is It's cold outside Tilda. I dusted off my Spectrum Noirs (pens and pencils) and set to work colouring her - 
  • skin - FS3, FS4, FS6, CR1 and 004
  • hat and coat - BT2, BT3, BT4, BT6, 052, IG1, IG3 and 117
  • hair - GB8, GB10 and EB7
  • holly - DG2, DG4 and DR1
  • sky - IB1
  • snow - IG1
I cut the image out with a Spellbinder's oval nestie, inked whilst still in the die with tumbled glass distress ink and matted onto a Spellbinder's Floral oval. I added lots of glitter before attaching it to the card base with Pinflair.
I cut 3 Spellbinder's snowflakes, attached them to the card with Pinflair and added turquoise pearls to the centre of each one.
To finish I added a sentiment from LOTV's Christmas wishes sentiment set, cut it out with Spellbinder's Resplendent rectangles and inked whilst still in the die with tumbled glass distress ink. I then attached the sentiment with Pinflair.

I would like to enter this card into the following challenge - 

Thank you for stopping by

Lesley

Friday 19 December 2014

It's Christmas

Good Friday evening everyone

Hooray! Finally finished for the Christmas holidays after a very busy week with extremely excited 5, 6 and 7 year olds. Eyes down now for the big day. Lots of shopping, wrapping and cooking to be done before then though. 
Today's card is another one made using LOTV's Furry Christmas art pad. This is the last one I promise. I am feeling like a very lazy crafter at the moment but needs must and all that.
I began by covering a 6 inch square card blank with a piece of red Bazzil cardstock. I then cut a piece of paper from Bobunny's Elf magic paper pad with a Tonic layering square, wrapped a piece of ribbon (from the Ribbon Girl) around the centre and then attached to the card base.
As I said earlier the image is from LOTV's Furry Art pad which I cut out with a Tonic layering square die and inked whilst still in the die with tumbled glass distress ink. I then added lots of glitter and matted the topper onto a piece of red Bazzil cardstock. I attached it to the card with foam pads.
To finish I stamped a sentiment from LOTV's Christmas wishes stamp set which I cut out with a Spellbinder's Resplendent rectangle die. I cut another of the dies in the set from the Bazzil card and matted the sentiment onto it. I attached the whole thing to the card with Pinflair.

Thank you very much for stopping by and reading my blog.

Lesley

Monday 15 December 2014

Let it snow, let it snow, let it snow......

Hello everyone

Well it is the start of a very busy last week at work and a frantic one at home while I try to finish off all my Christmas cards - 
I began by covering a 6 inch square card blank with a paper from Bobunny's Elf Magic paper pad. I then embossed a piece of white centura pearl with an Embossalicious embossing folder and wrapped a piece of ribbon (from the Ribbon Girl) down the centre of the card. 
The image is from LOTV's Furry Christmas art pad which I cut out with a Spellbinder's matting basics A. I inked whilst still in the die with tumbled glass distress ink, added lots of glitter and matted it onto a piece of red spotty paper from the pad. I attached it to the card with foam pads.
I tied a snowflake charm (from my stash - maybe from the Ribbon Girl) with a piece of bakers twine and attached it to the ribbon with Pinflair. I then tied a knot in another piece of ribbon and attached it to the ribbon to cover up the messy ends of the bakers twine.
To finish I added a sentiment from LOTV's Christmas wishes stamp set.

I would like to enter this card into the following challenge - 
http://ribbongirls.blogspot.co.uk - lovely Lili challenge - anything goes

Thank you for stopping by

Lesley

Sunday 14 December 2014

Dashing through the snow......

Hello folks and a very happy Sunday afternoon to you all 

Yesterday my eldest son came home from Uni. It is lovely to have him home if only for a few weeks. My hubby and children are busy putting up all the Christmas decorations as I am typing this post and this morning I managed to complete all my present shopping. All I need to do now is get them wrapped and posted. I sound very organised but I promise you I am not. I am still frantically making Christmas cards and here is another one using the LOTV Furry Christmas art pad - 
I began by trimming the image and matting it onto a piece of blue paper from Docraft's Forever Friends Kraft notes. I added lots of glitter to the image and then cut another of the papers with a Tonic layering square die and matted it onto a piece of blue paper. 
I then wrapped a piece of ribbon (from the Ribbon Girl) around the centre and attached the whole thing to a 6 inch square scalloped card blank. I attached the image to the card with foam pads.
I cut several snowflakes using Die'sire snowflake die and some white centura pearl. I layered the snowflakes on top of each other, added a gem to the centre (from the Hobby House) and attached the snowflake to the card base with Pinflair.
To finish I added a sentiment from LOTV's Christmas wishes stamp set.

Thank you for stopping by and reading my blog.

Lesley

Friday 12 December 2014

Merry Christmas James

Good morning folks

Here is another card made with the Furry Christmas art pad - 
I cut a paper from my stash using a Toinc layering square , then cut a coordinating paper with Tonic's Just a note die set and attached the white paper to the red one. I then wrapped a piece of ribbon from the Ribbon Girl around the centre and attached the whole thing to a 6 inch square card blank.
The image is from LOTV's furry Christmas art pad which I cut out with a Tonic layering square, added lots of glitter and matted onto a Tonic Just a note die cut from the red paper. I then attached the topper to the card with foam pads.
I stamped a sentiment from LOTV's Christmas wishes stamp set, cut it out and added glitter to the edge.
Another one finished!

Thanks for stopping by

Lesley